Unlock the power of Sponsored Product Ads! Go beyond simple setup to master targeting, placements, and advanced strategies for massive Amazon sales & organic growth.
Amazon Sponsored Product Ads: Playbook, Examples and Benchmarks
While many different ad types and strategies exist today, sponsored product ads (The OG ad type) still reign supreme. That’s because sponsored products produce an average of 80-100% of your ad sales and have the biggest impact on organic rank out of all the ad types.
But, setting up your sponsored product ads can seem deceptively simple. Because, unlike display and brand ads, you don’t need to create your own text, images, or video content for it. In reality, though, there are 4 different targeting types for SP, 3 match types, 3 placements, and an infinite number of techniques you can use.
In this blog post, we’ll cover it all. We’ll teach you the basics of sponsored products, and the advanced strategies used by 7 and 8-figure sellers to skyrocket their sales.
What is a Sponsored Products ad?
Sponsored product ads are a form of native advertising that allows you to get increased visibility in search results and product detail pages on a pay-per-click basis.
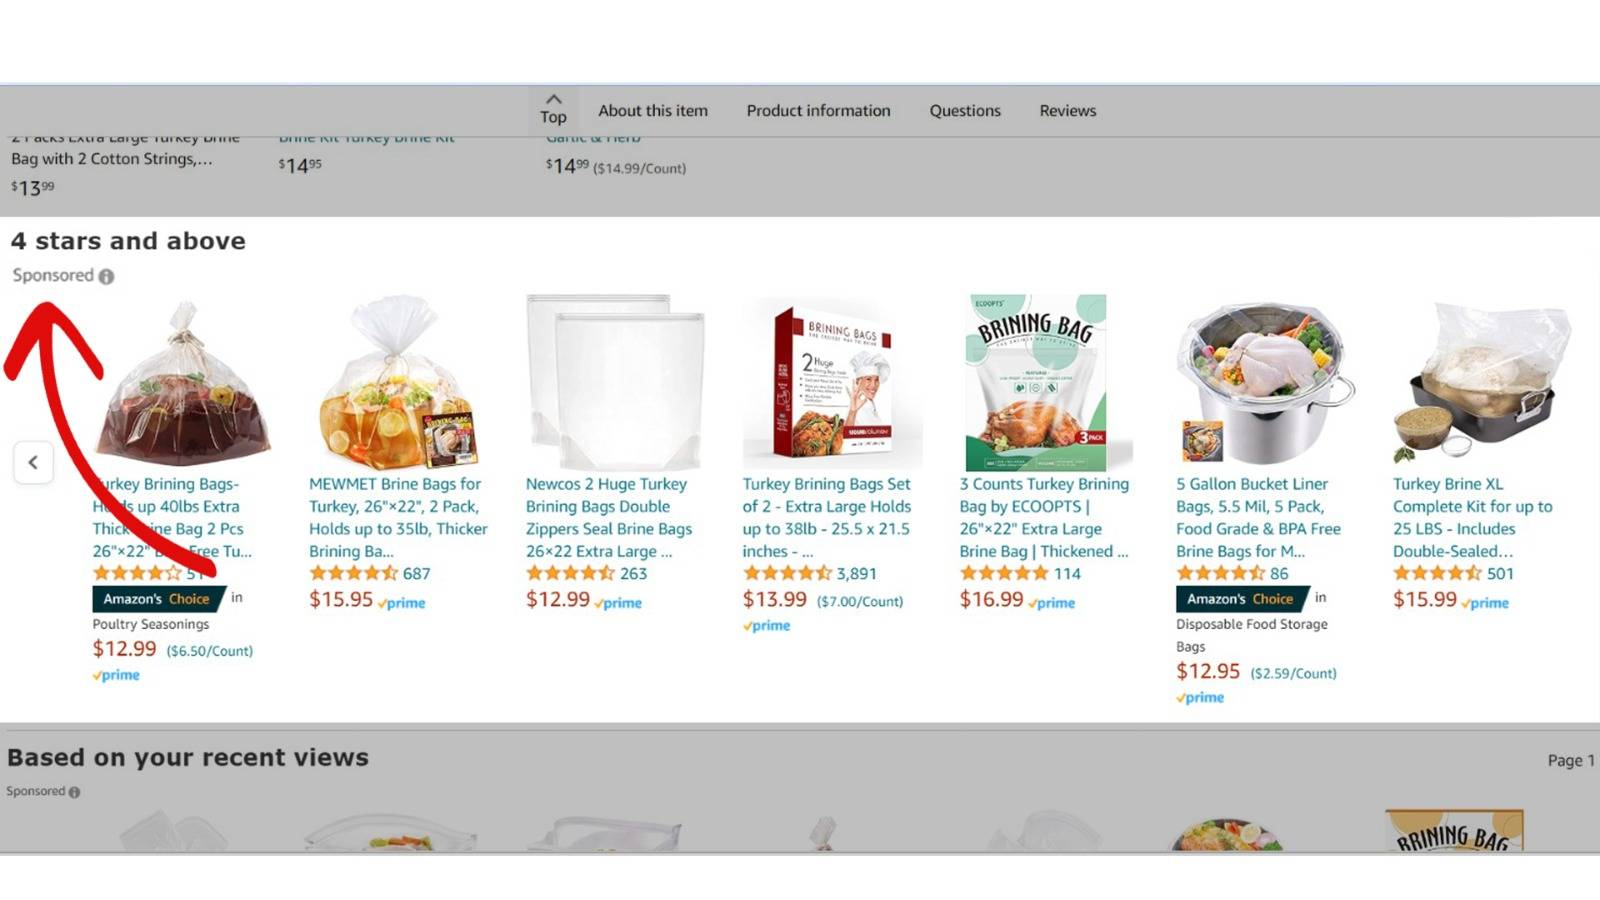
They’re designed to look very similar to organic search results but have a small “sponsored” tag so that customers can differentiate between the two.

Search result placement
Product detail page placement
SP ads can be used by Amazon sellers to target specific keywords that their customers are searching for. They can also be used to target the detail pages of their competitor’s products to lure their customers away.
Sponsored Brands vs. Sponsored Products vs. Sponsored Display
Sponsored products is far from the only ad type on Amazon. You also have sponsored display and sponsored brands, which are slowly becoming more popular.
The main differences between the three are the placements they show up for, the design of the ads, and the content needed to create them.
Here’s a quick breakdown of everything:
Sponsored Display vs Sponsored Products
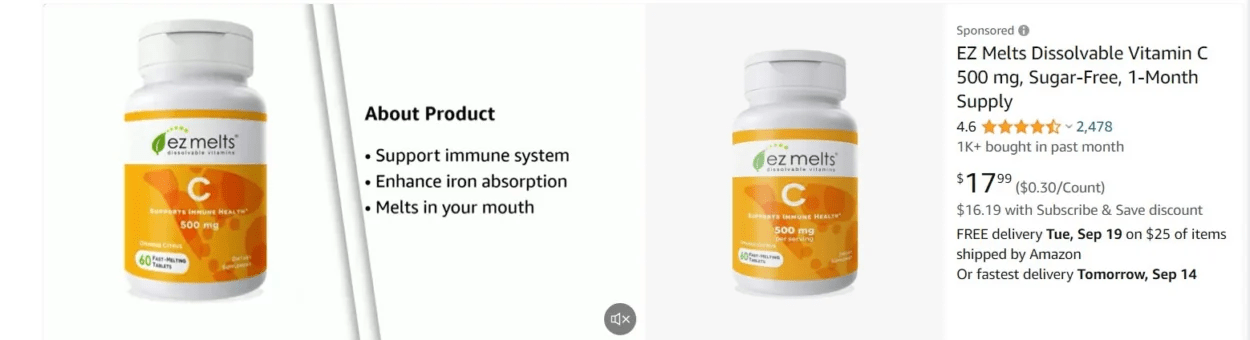
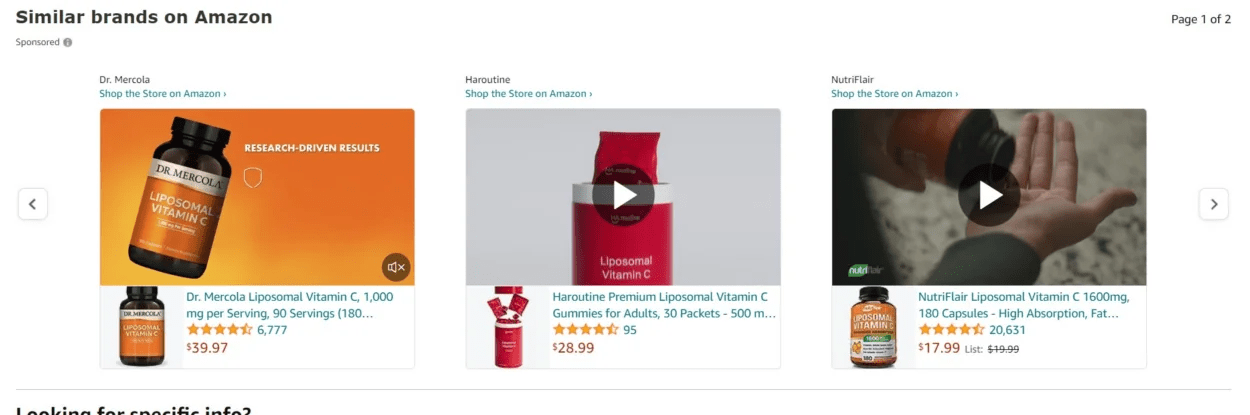
Sponsored display is considered by most to be a weak ad type. One of the reasons for that is that it’s not as ‘native’ as sponsored products ads.
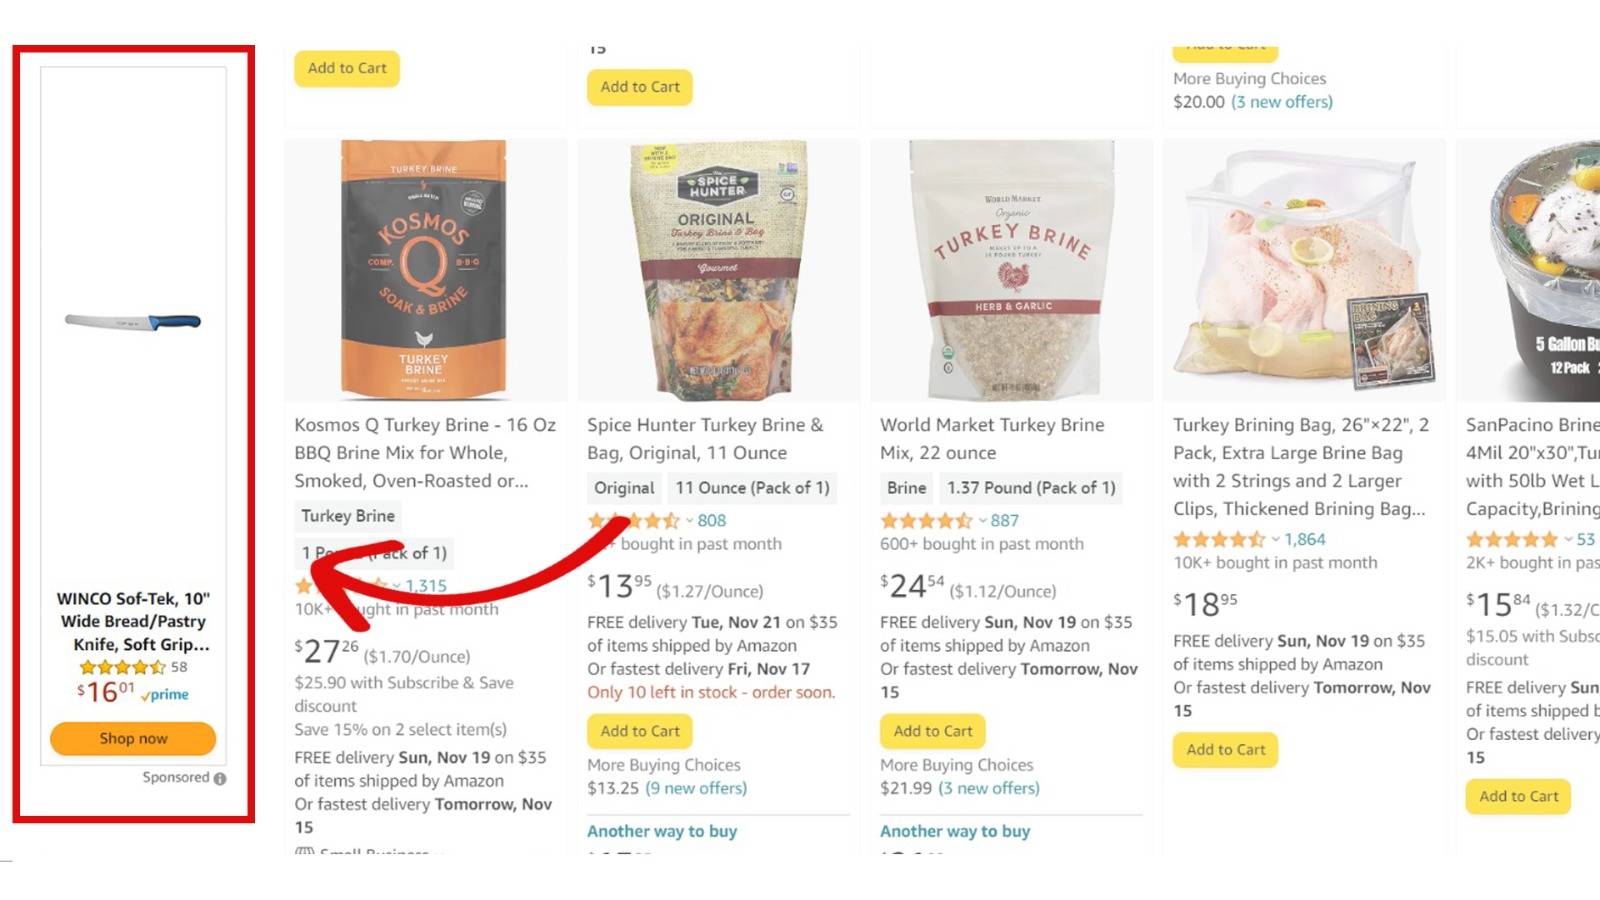
While SP ads show up in search results and product detail pages in a similar format as organic results, SD ads show up exclusively as banner ads at the side and bottom of your screen.
Search result placement
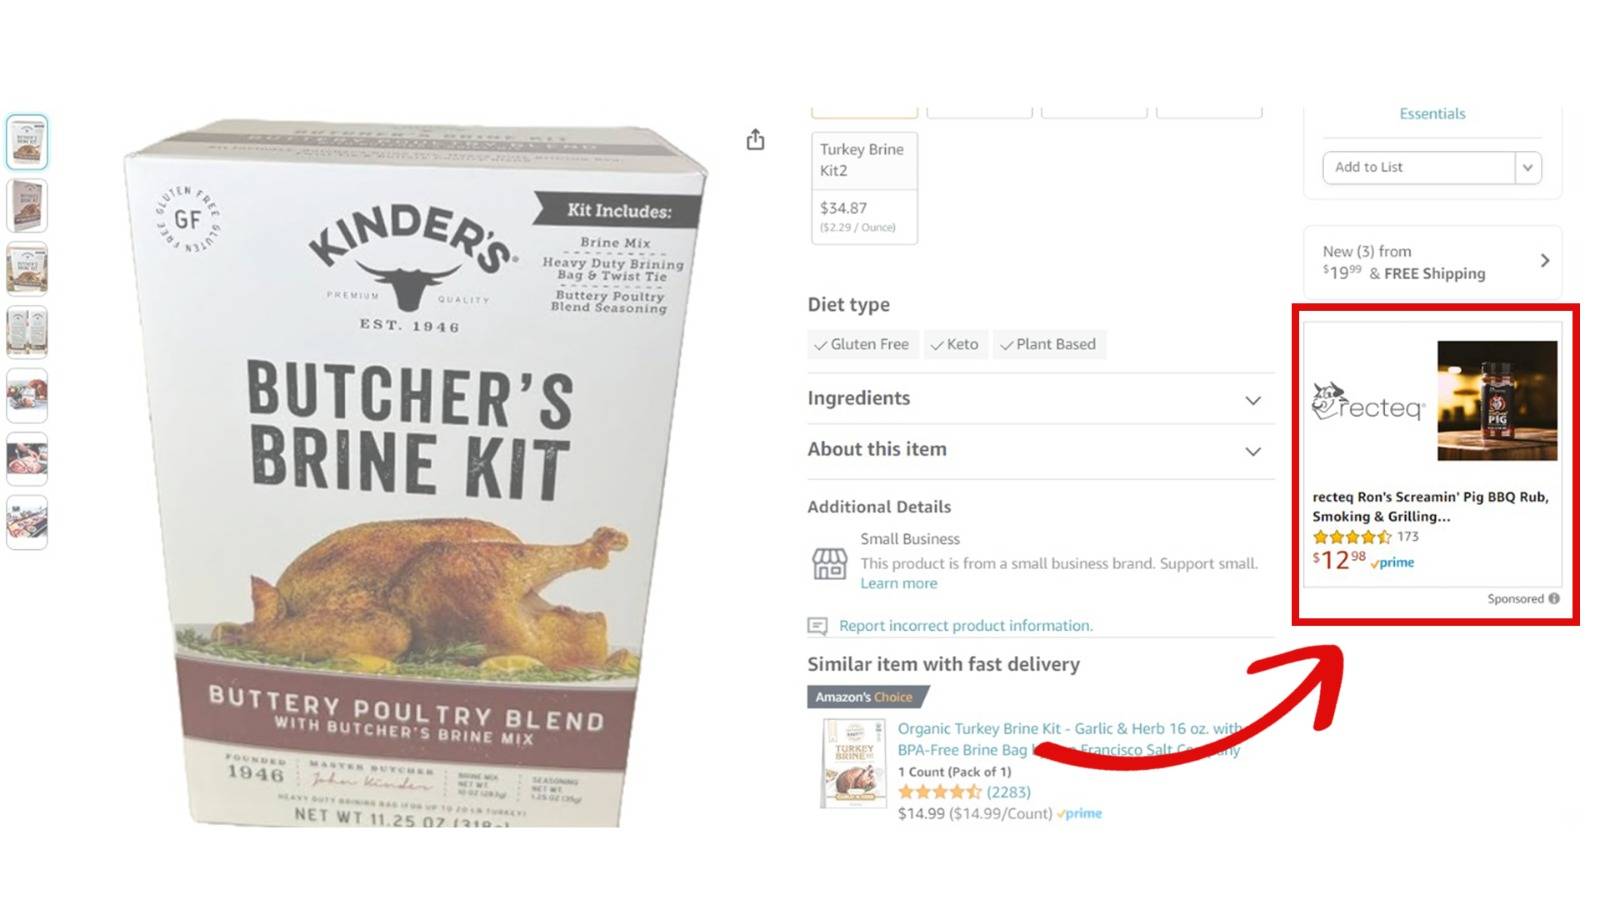
Product detail page placement
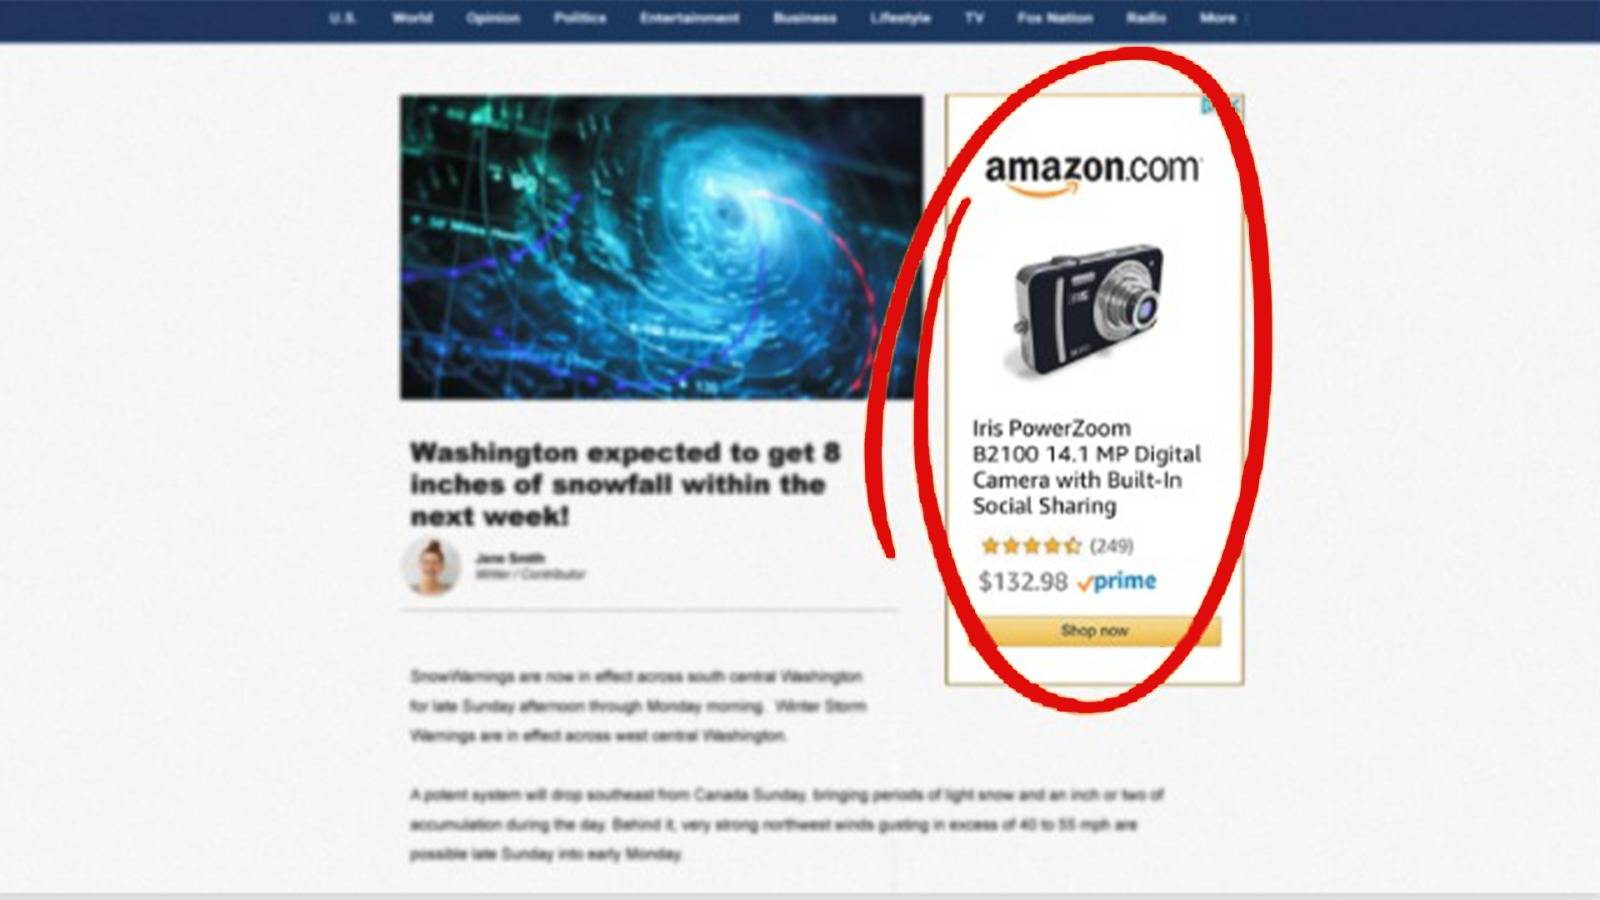
Off-Amazon placement
This difference in placements and design makes it less likely for people to notice SD ads and click on them.
Another fundamental difference between SD and SP is the targeting capabilities you get. With SP, you can use keyword and product targeting to show up in front of customers actively looking to buy.
With SD, you don’t have access to keyword targeting, you only have access to product and audience targeting.
SD Product targeting works the same way as it does with SP, but audience targeting is completely different. With audience targeting, you’ll show your ad to people based on their interests and demographics, which means you start to reach people who aren’t actively looking for what you’re selling.
For example, in the first image of this section, you’ll see an SD ad for a knife in the search results for the keyword “turkey brine kit”
This combination of weaker targeting options and ad placements generally makes SD a lower-performing ad type compared to SP.
Sponsored Brands vs Sponsored Products
Sponsored brands is pretty similar to SP in both form and function. You have very similar targeting options, similar placements, and similar performance in terms of ACoS.
There are a few main differences between the two though:
1. There are a lot fewer SB placements on Amazon than SP placements
2. SB doesn’t have auto-targeting
3. SB can advertise more than one product at once and can take you to an Amazon storefront instead of a product page after you click
4. You need to include custom text and visuals in SB
5. SB can be run as either a video ad or an image ad
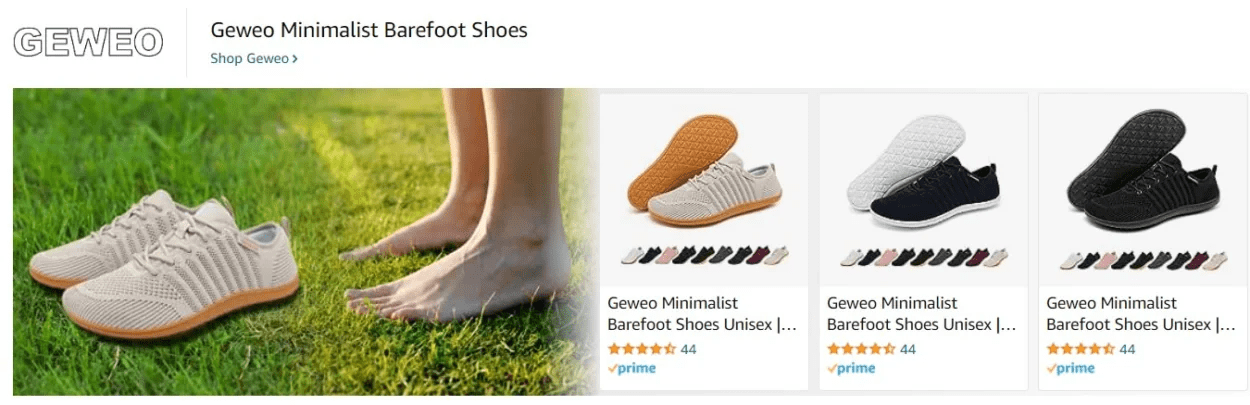
SB product collection ad in search results
SB video ad, also in the search results
SB ads on a product detail page
Besides the need for custom content, and the ability to advertise multiple products in one ad, SB is very similar to SP and performs well in terms of ACoS.
Benchmarks
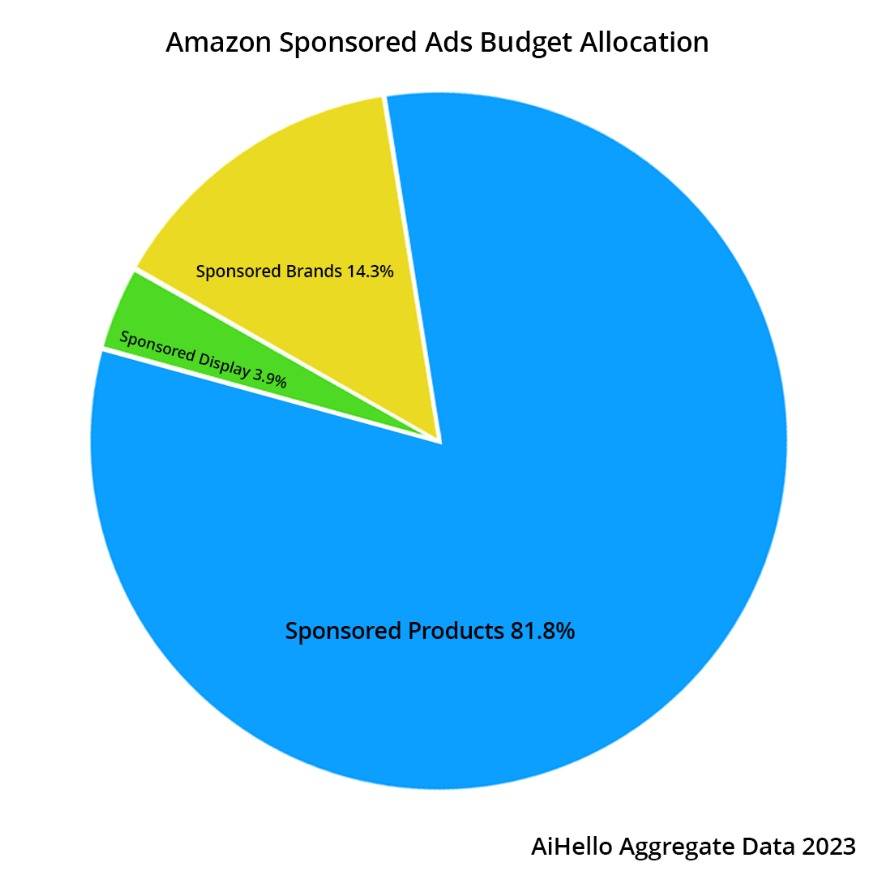
To help you get a full understanding of each ad type, we’ve aggregated the following data from our 5000+ accounts:
Spend Allocation
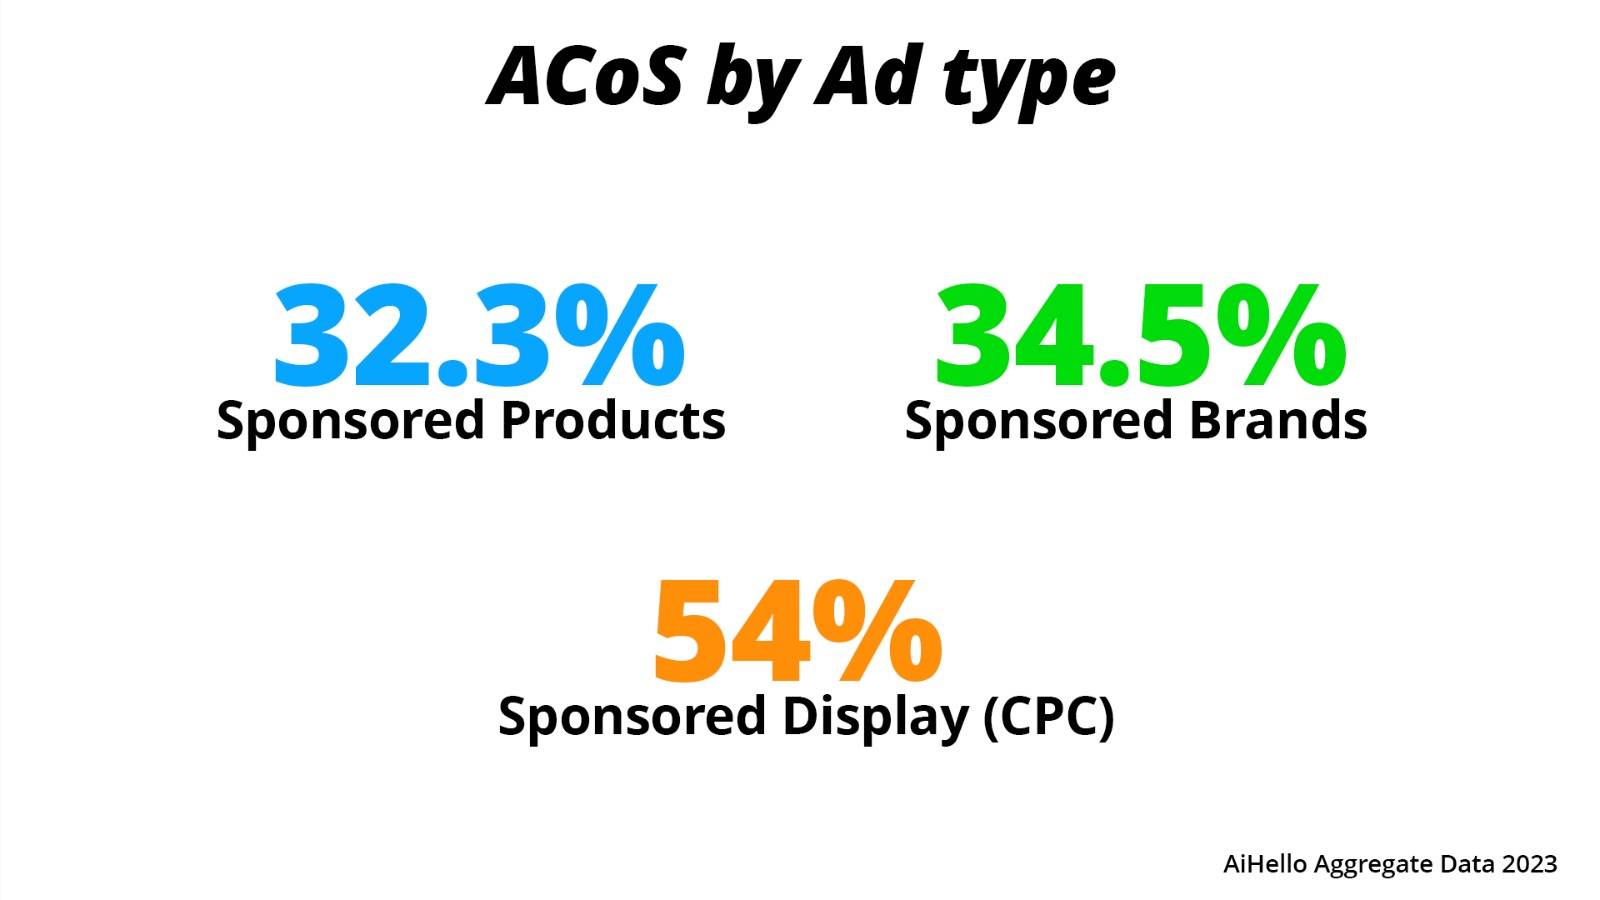
ACoS by Ad Type
How to Win with Sponsored Products Ads
I mentioned earlier that SP can seem deceptively simple. In this section, I’ll explain why it’s actually complicated + how to win with SP regardless.
Perfect Targeting
There are 4 main targeting types when it comes to SP, and knowing how to utilize them all properly is very important:
Keyword: With this form of targeting, you specify the customer search terms you want your product to show for and how much you’re willing to pay for each resulting click.
ASIN: With ASIN targeting, you tell Amazon the specific product pages you want to advertise on and how much you’re willing to pay for a click from each one.
Auto: Amazon will automatically show your product on relevant search terms and product pages with Auto targeting. The only caveat is that you can’t adjust your bid on a keyword or product-target level.
Category: This is like an auto campaign for product targets in your category. You just give Amazon certain criteria, like category name, product price, and reviews and it will find all the targets for you.
Generally speaking, keyword and auto-targeting will be your biggest in terms of both spending and sales, followed by ASIN targeting and then category targeting.
This doesn’t mean you shouldn’t use all targeting types though. Your eventual goal is to set up everything to get as much visibility as possible.
Utilizing Match Types
The keywords you advertise on aren’t always the search terms your ad will show up for, and that happens because of match types.
There are three match types on Amazon: broad match, phrase match, and exact match, and they determine how different the end search terms can be from your original keyword.
With exact match, your end search term is always the same as your original keyword.
Whereas with phrase match, your end search term only has to include the original phrase from your keyword but can contain anything else before or after.
With broad match, only the words from your keyword have to be present, but it doesn’t matter where and when they show up in the end search.
Here’s a graph to help you visualize this:
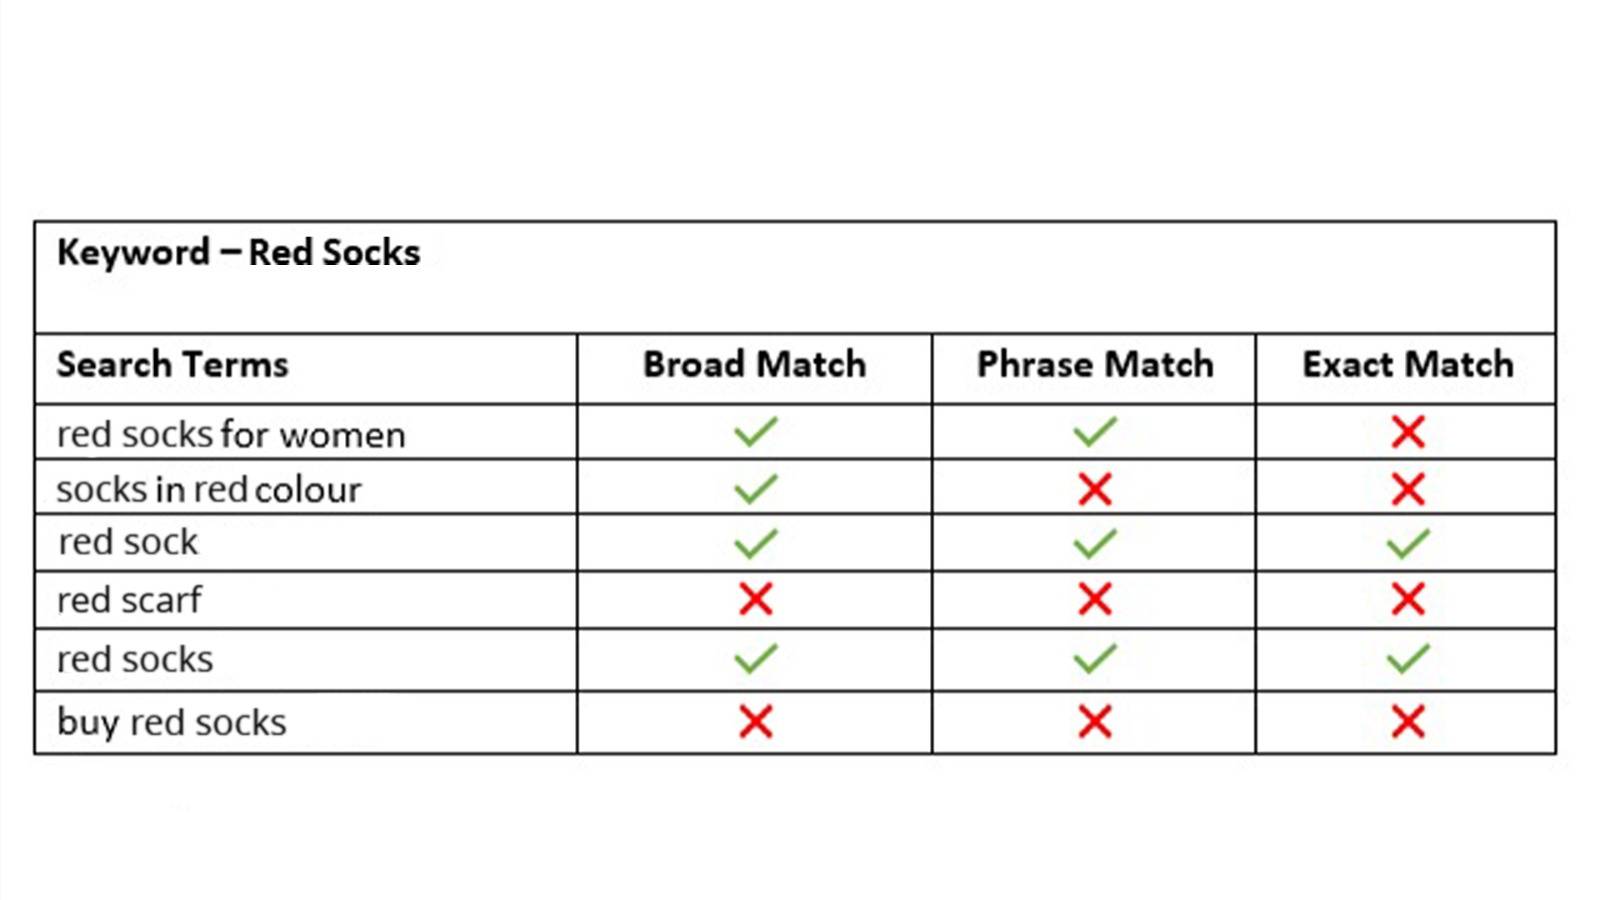
While your end goal is also to utilize all match types, it’s good to know what each match type is specifically good for:
Broad match: Broad allows you to cast the widest net. You’ll show up for significantly more search terms than you would with any other match type, you’ll increase your visibility, and you’ll often pay less for a click.
Phrase match: Phrase won’t necessarily find any new search terms that you couldn’t get from broad or exact but it’s good for a more targeted approach. You can use phrase for things like brand defense where you target your brand name and show up for all search terms that contain that full phrase.
Exact match: Exact is good for drilling down on specific keywords that are important to you. You can also use it to improve your organic rank more effectively.
Keyword Harvesting
Once you have broad, phrase, and auto campaigns set up, you’ll start showing up for search terms that you aren’t directly targeting as keywords. These terms can be harvested from your search term reports and added to your campaigns to expand your reach
To do this manually, you can download your search term reports (shown in the picture below) and add a filter for 7-day total sales above 0 to find all of your converting keywords.
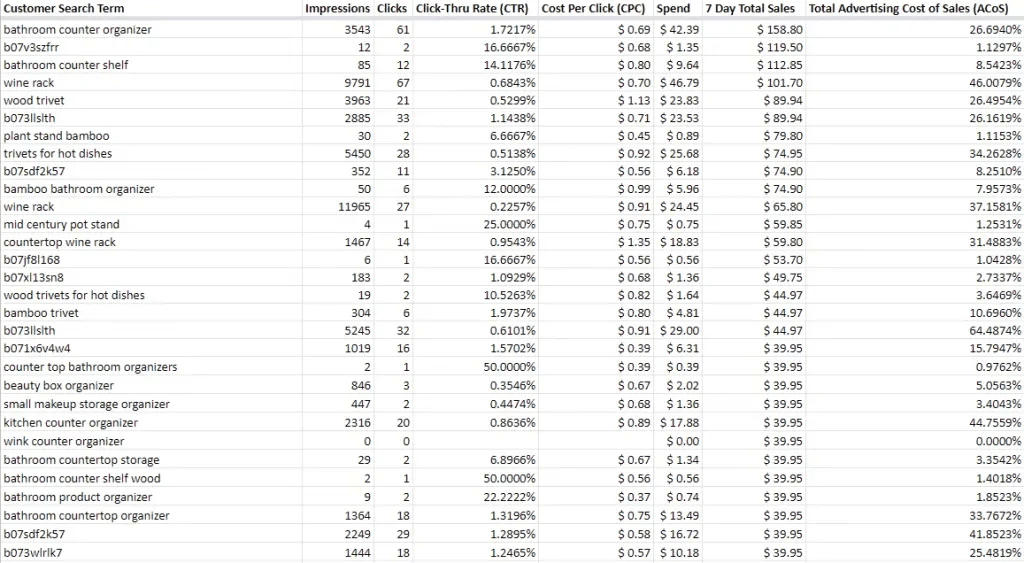
Doing this every week can increase the number of keywords and product targets you advertise on by 400+ per month, depending on the number of ASINs you have. Our average user saw a 10% revenue increase on ASINs they set up harvesting for within 4 months.
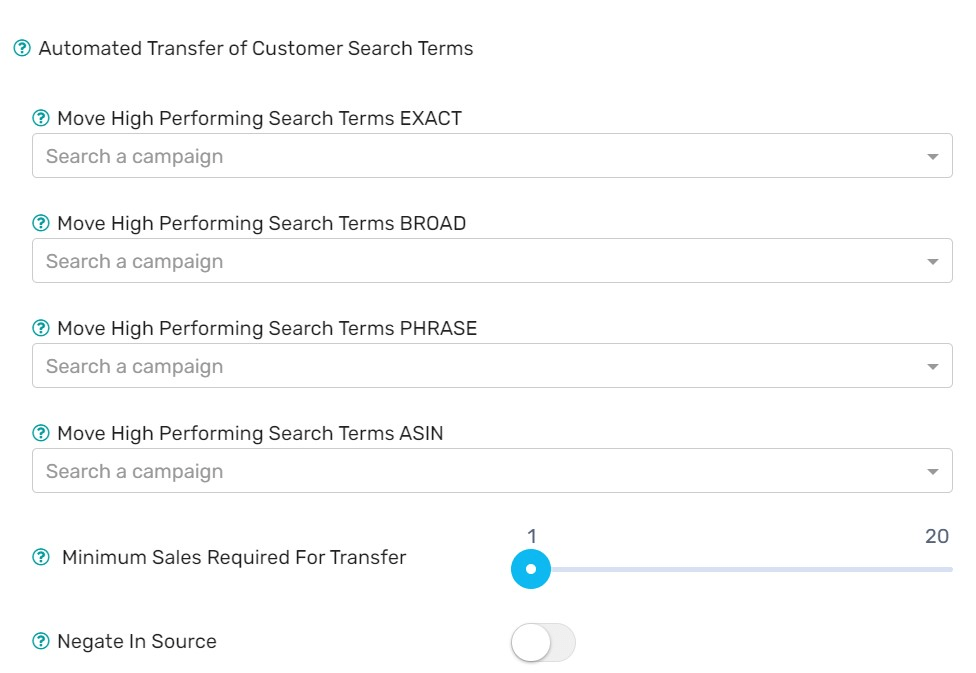
To save time, you can also do this automatically through a tool like AiHello. All you have to do is connect your campaigns through the tool (one source campaign and one receiving campaign) and specify how many sales are needed for a transfer and what match type the end keyword should transfer in.
Ideal Campaign Structure
There are many different ways to set up your SP campaigns, some of them good and some of them bad.
After years of testing here are AiHello, we’ve come up with our own ideal campaign structure that we believe performs best.
Here’s how it works:
- 1 ad group per campaign
- 1 ASIN per ad group (+ variations)
- 1-20 keywords per campaign
- 1 match type per campaign
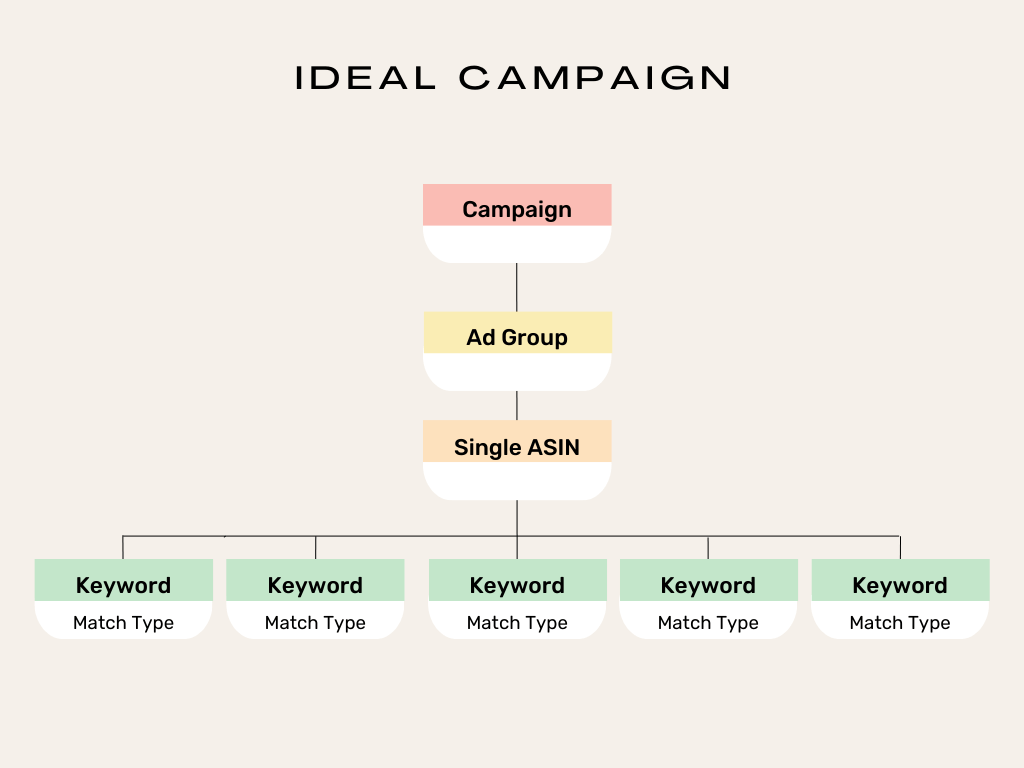
There are several benefits to this structure, the first one is organization and naming. When you have your campaigns structured this way, you can name each campaign by the specific ASIN it advertises and the match type it uses. This allows you to search “exact” for example and see how all exact campaigns perform, or search for a specific ASIN and see how all of its ads perform.
The second benefit is that it allows you to allocate your budget more efficiently. If you have a campaign with a single ASIN and 5 keywords in exact match, you know that the $50 budget you set is going specifically to this ASIN, this set of keywords, and this match type. Whereas if you have 20 products in a campaign, 300 keywords, and all 3 match types, you have no idea where your budget will end up going.
So for the sake of keeping everything segmented and distributing your spend effectively, we suggest you follow the campaign structure we outlined above.
Setting This Up Automatically
If all of this seems like too much effort to set up, don’t despair. This entire process is entirely automatable through AiHello.
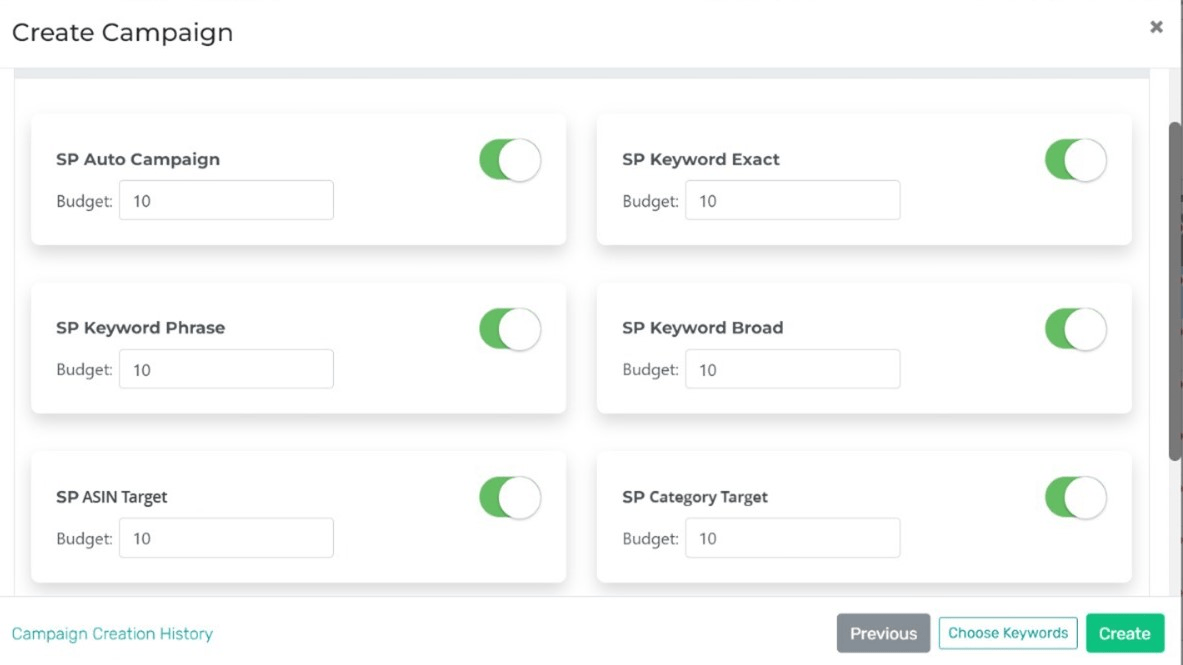
Using the tool in the picture above, you can create new ads in all 4 targeting types and all 3 match types just by checking each one off and clicking ‘Create’.
The campaigns will then be created automatically on Amazon with the ideal structure, and appear with all the keyword, ASIN, and category targets with their match types already in place.
From there, harvesting is set up automatically to guarantee a new, constant stream of keywords being added to your campaigns.
Bidding Effectively
Once you have campaigns set up with good targeting and good structure, the only remaining piece of the puzzle will be effective bidding.
With any type of SP campaign, you’ll have to specify how much you’re willing to pay for a click, which is where the traffic and cost dilemma begins.
If you bid too low, you’ll have a great ACoS but your traffic and sales will be very low. If you bid too high, you’ll get a lot more traction but your ACoS will shoot up as a result.
This is how the idea of having a target ACoS came about. Instead of being in a constant struggle between high sales and low ACoS, you just decide what ACoS you’re willing to accept (usually in the range of 20-40%) and then adjust your bids to reach that target.
From there, people started developing different bidding strategies, some done manually and others automatically using software and algorithms.
Manual Bidding
With manual bidding, you’ll usually adjust your bids at least once every 3 days (or ideally, every day) based on the distance between your current ACoS and target ACoS on a keyword level.
There are multiple methods for doing this, here are the two most common ones:
EPC Bidding: This is where you multiply your ACoS target with your EPC (earnings per click) to find out what your ideal bid should be. If you earn $4 per click and have a 20% ACoS target, your ideal CPC would be $0.80 for example.
Rule-Based Bidding: This is where you set certain rules for your bids. For example, if ACoS is above X amount, decrease bids by Y amount, and so on. This strategy is more customizable but it requires a certain level of experience to pull off.
We’d suggest starting with EPC bidding because it’s more straightforward, especially for beginners.
Automated Bidding
With automated bidding, you don’t have to make any manual changes or calculations. Every single bid, on every keyword is changed automatically every day.
This makes it generally more accurate and less labor intensive but offers you less control at the same time.
The way it works is you set your target ACoS for each campaign through the software (as seen in the image below)
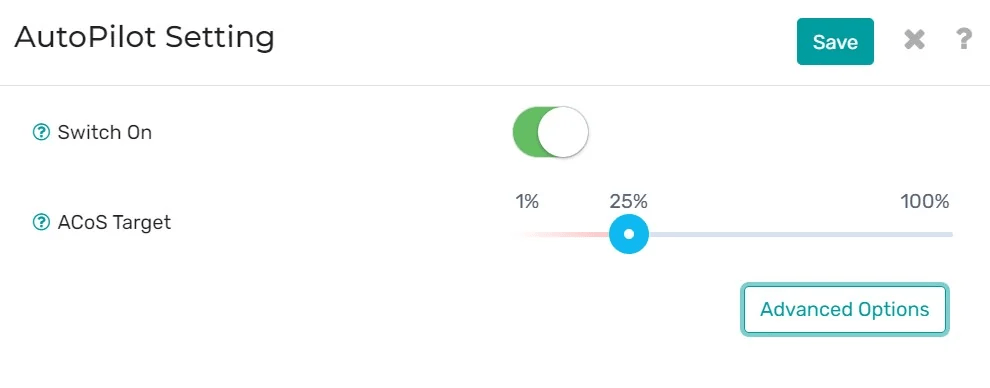
Then the software will automatically change the bid every day based on this target and then display all changes to you on a graph, like the one pictured below.
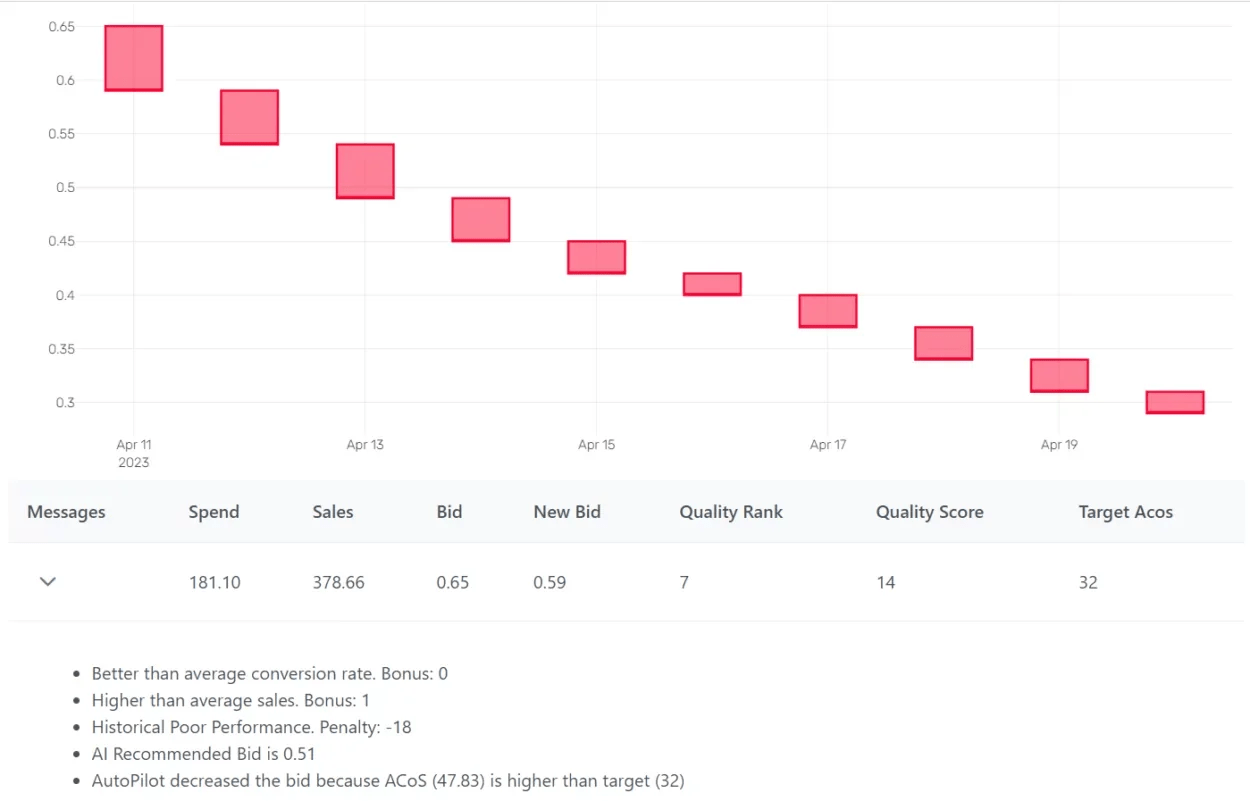
After around 2 weeks of doing this, most sellers start to see a noticeable improvement in ACoS.
Examples of Strategies That Worked
Now that we’ve covered all the basics, I’ll show you examples of three working strategies + break down why they worked.
1. Expanding match types, targeting types, and setting up harvesting
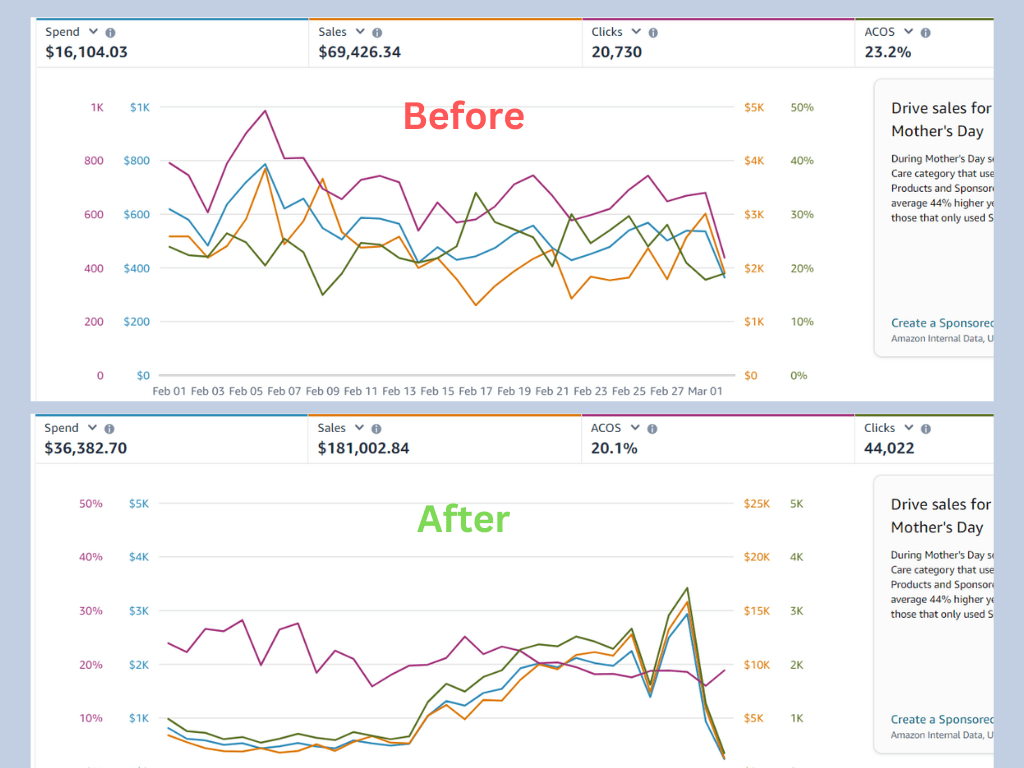
This account was initially using only keyword-targeting campaigns in exact match. This strategy did make them $70k in monthly revenue at a 20% ACoS, but it also caused them to leave a lot of money on the table.
After signing up, they used AiHello to create new campaigns in Phrase and Broad match to expand their match types. After that, they set up new ASIN targeting, auto-targeting, and category-targeting campaigns using our campaign creator tool.
Once that was done, they set up automated harvesting to pick out the profitable search terms from auto, phrase, and broad and repurpose them as keywords in their campaigns.
This led to a pretty fast rise in ad spend and ad sales, taking them from $70k a month at a 23% ACoS to $181k a month at a 20% ACoS.
2. Using AI bidding to decrease ACoS
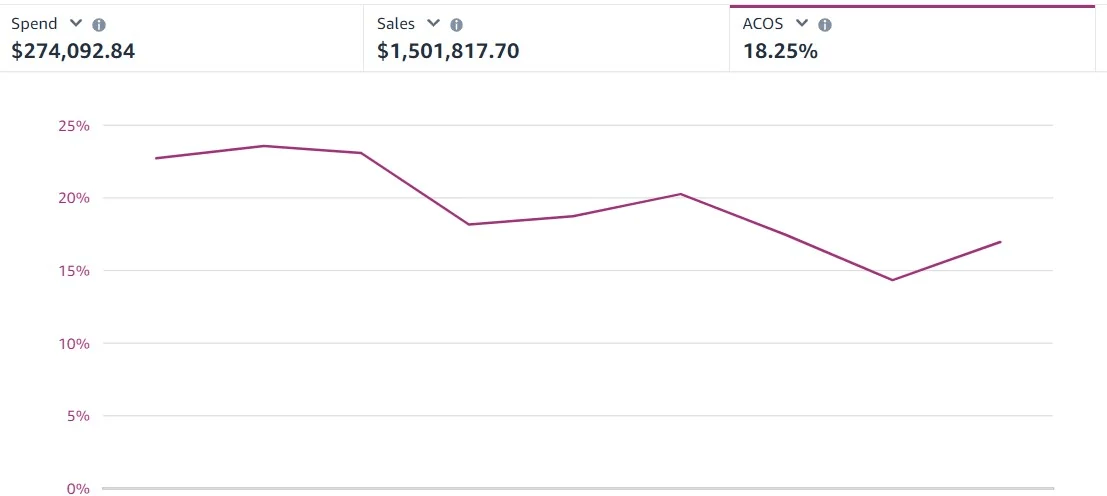
While this account has always been a high performer in terms of revenue, they were often disappointed with the profits they had at the end of the month because of their tight margins.
After a quick audit of the account, our team was able to identify that the reason behind their high ACoS was their inconsistent and inaccurate bidding strategy for their SP campaigns.
They were making 1 bid change per keyword per week and it was mostly based on gut feeling rather than real data.
So we started using automated AI bidding for them and within 4 months they reached a 14% ACoS, all the way down from 24% earlier in the year.
3. Low ACoS Auto campaign strategy
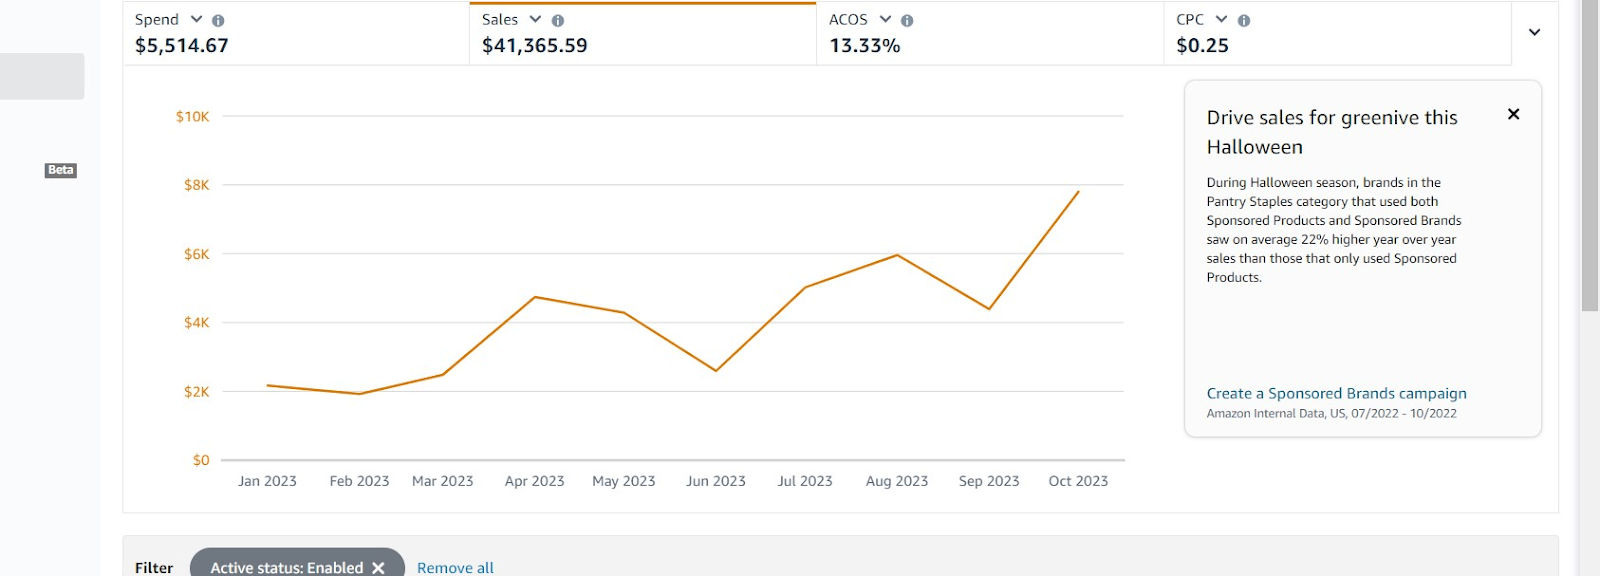
With this account, the owner was looking for ways to increase sales at a low ACoS to bring in more profit at the end of the month.
So we set up what’s called a ‘catch-all campaign’ which is essentially an auto-targeting SP campaign that includes all of the products in an account and uses very low bids.
This will show your products on a very wide range of search terms and cost you only a few cents per click, which usually leads to good sales at a sub-15 % ACoS.
Wrapping Up
It’s impossible to succeed on Amazon without using sponsored products effectively, which is why getting your targeting, bids, and campaign structure right is essential.
This article has covered pretty much everything you need to know about SP, so now that you’ve read it you’re ready to go make some low-ACoS sales.
Good luck!