Unlock Amazon sales success! Optimize your product listings with SEO & ad strategies, plus master Amazon’s algorithm for higher rankings.
Amazon Product Listing Optimization – The Practical Seller Guide
When selling on Amazon, the best product doesn’t always win. It’s like a race where even the most talented athlete has to follow the rules to win.
Whether you are new to Amazon or just looking to get more eyeballs on your products, you need an optimized Amazon listing to get traction. This guide will show you how to optimize your Amazon product listing and increase your sales faster.
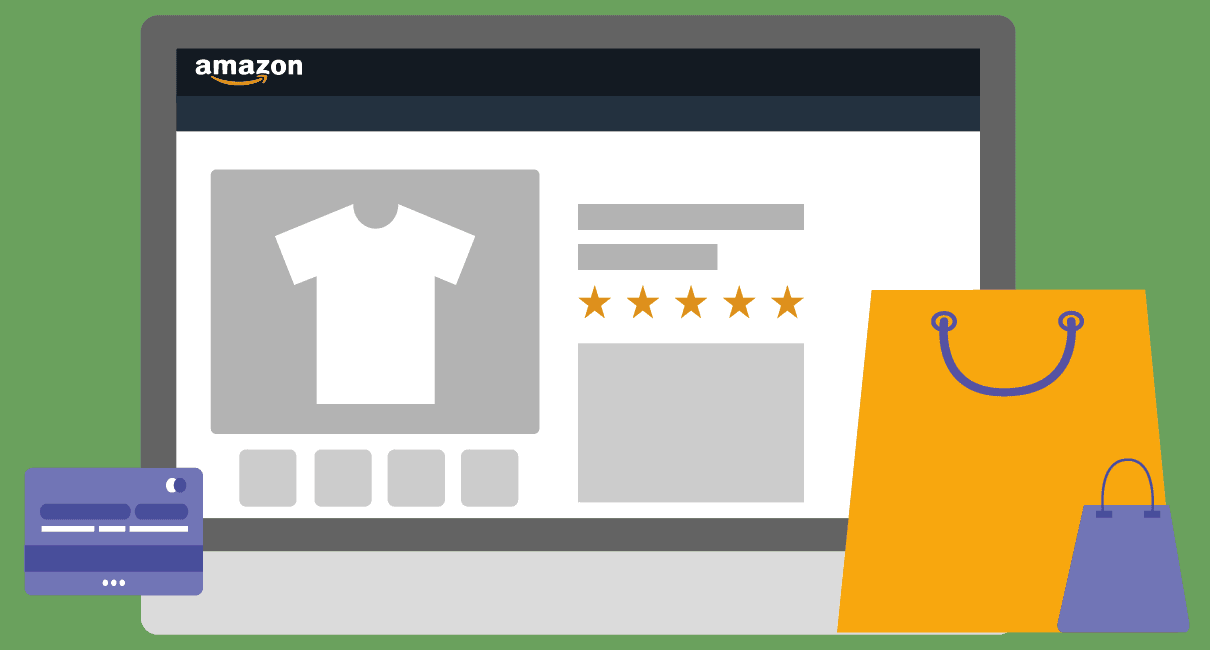
What is an Amazon product listing?
An Amazon product listing is a page on Amazon where sellers describe the product they have for sale.
Just as a popular boutique in a bustling shopping district carefully displays its finest products in the storefront window to draw in passersby, sellers also curate their Amazon product listings with enticing titles, bullet points, A+ content, captivating images, and other features to catch the attention of online shoppers.
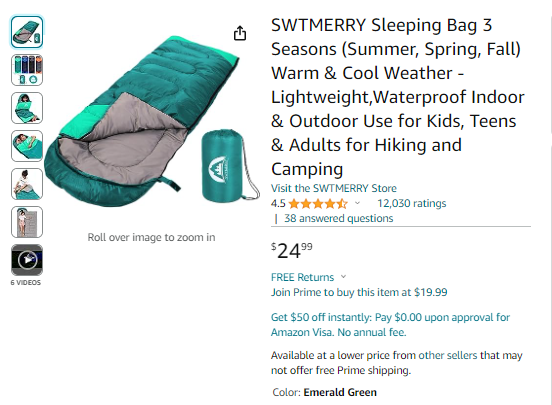
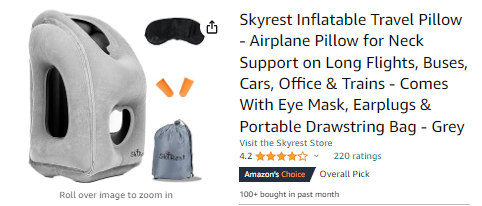
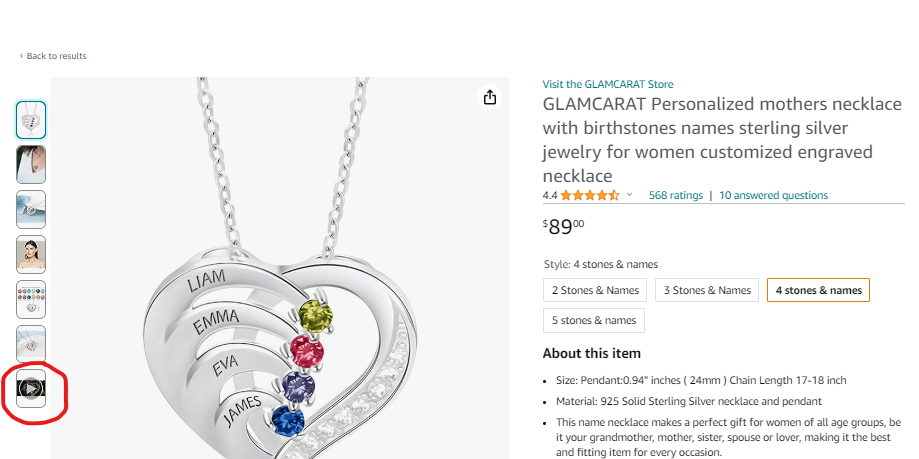
Here’s an example of a product listing:
Now that you’re familiar with what an Amazon listing is, let’s discuss how sellers can make them rank and use them to get more customers.
Factors that Influence Amazon Ranking & Sales
When it comes to selling on Amazon, it all boils down to getting your listing in front of your prospective customers and getting them to buy from you.
There are only two ways to get your product listing in front of Amazon shoppers.
- Advertising: To ensure potential customers see your product on Amazon, you can pay Amazon to show it to them. It’s like putting up a billboard in a busy area so everyone notices your brand.
- Search Engine Optimization (SEO): This involves making your product more relevant for Amazon’s search algorithm by using specific keywords and details that make your listing show up when someone searches for your product.
The best strategy for growing your Amazon sales is a combination of SEO and advertising.
SEO helps your product show up in organic search results, making it a cost-effective way to reach potential customers while advertising helps you reach more people faster.
It’s like a superstar team where each player can not excel without the other.
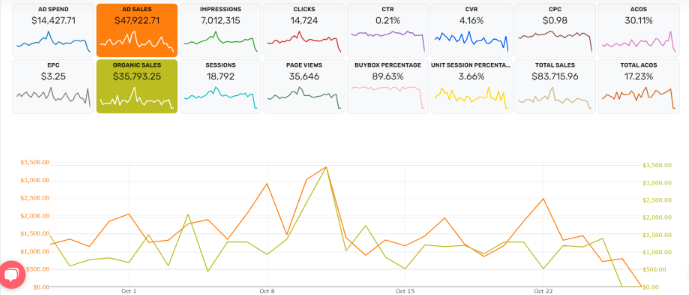
Below is an example of one of a seller who’s harnessing the power of Amazon SEO and ads.
Image Source: AiHello Smartview dashboard
But beyond SEO and advertising, Amazon wants to only show shoppers product listings that are relevant to what they are searching for.
This next section shows how Amazon’s A9 search algorithm decides which products are relevant and assigns them their organic rank.
How Amazon’s Search Algorithm Works
Think of Amazon as a giant library with millions of books. When shoppers want to find a specific book, they go to the librarian and tell them what they’re looking for. Amazon’s search algorithm is essentially a super-smart librarian for finding products.
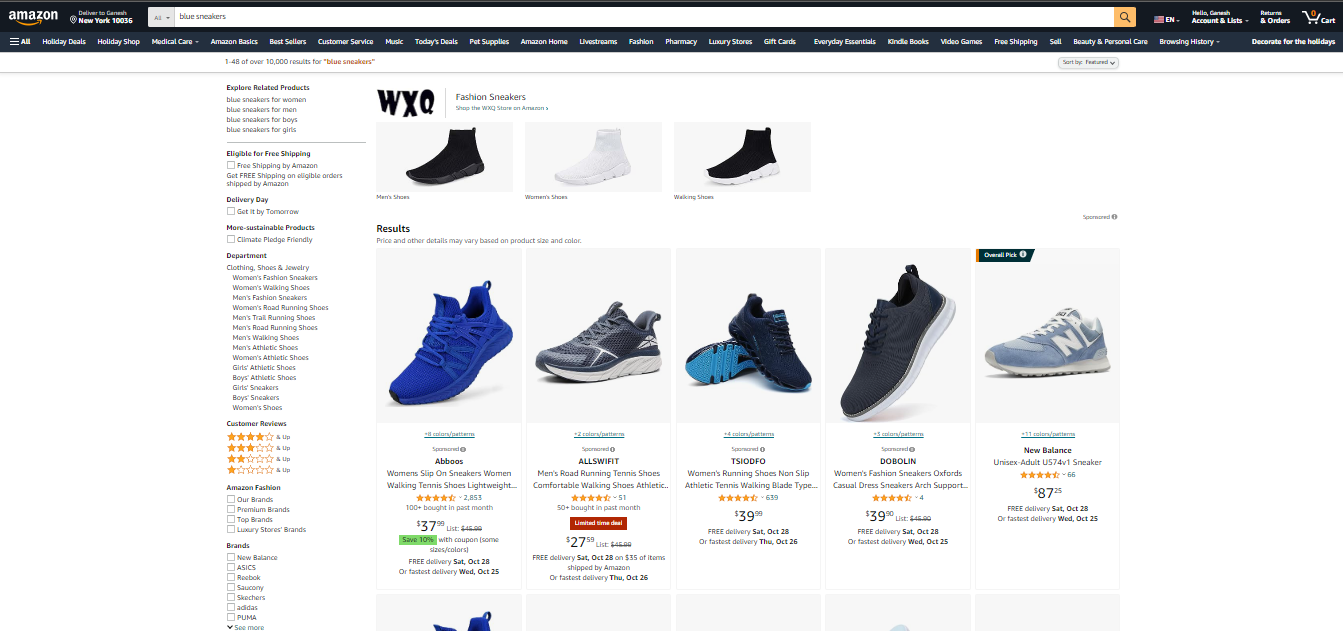
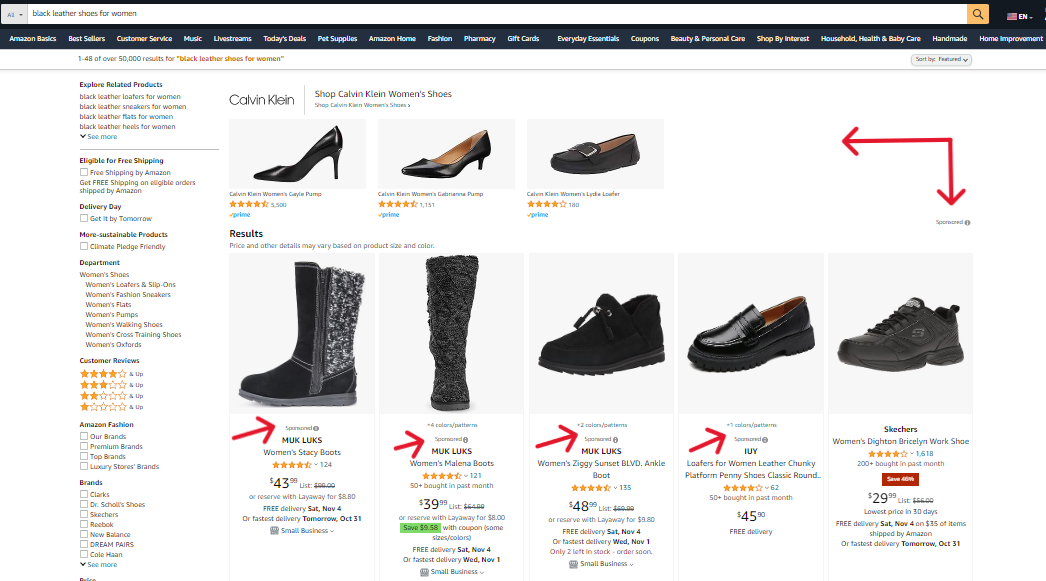
For example, when you type “blue sneakers” in Amazon’s search bar, the algorithm looks at all the products on the website and identifies the ones that match what you asked for.
Next, the algorithm makes an ordered list of the best-matching products and shows them to shoppers based on these factors:
- Sales Velocity: This is simply how fast a product is selling. If it’s selling quickly, Amazon’s algorithm will often rank it higher.
- Stock Availability: Having enough units in stock for customers to buy is a key determinant of whether a product listing ranks high or not.
- Sales Rank (Amazon Best Sellers Rank): This is a product’s rank in its category based on sales volume.
- Customer Reviews: Products with positive reviews, and a high review count, have a higher chance of ranking than those with negative or no reviews.
- SEO (Search Engine Optimization): This simply means using the right keywords in the product listing to help it show up in search results. Areas that can be optimized include
- Product Title
- Bullet Point
- Category and Sub-Category
- Backend Search Terms
- Time on Page and Bounce Rate: The longer a customer spends on your product listing, the more relevant Amazon will perceive it to be and the higher it will rank it. Optimizing your listing content can help prevent customers from bouncing and improve your overall traffic and conversion metrics.
- CTR (Click Through Rate): This measures how often people click on your product when they see it in search results. If your product gets clicked on a lot, it will rank higher. The formula for CTR is clicks divided by impressions.
- CVR (Conversion Rate): This shows how often people who click on your product actually buy it. Just like CTR, Amazon likes to show products with higher CVRs to more people. The formula for CVR is order divided by clicks.
Now that we’ve discussed how to rank higher and get traffic, it’s time to talk about how to turn this traffic into sales.
In this next section, we’ll see what Amazon shoppers consider before clicking the “buy now” button.
Ready to skyrocket your sales?

AiHello automates everything, from campaign creation, bidding, keyword addition or removal, and negation so you can grow your business. We also have our own in-house team of PPC specialists, copywriters, catalog experts, and graphic designers to help you with all things Amazon.
Criteria that Influence Shoppers’ Buying Decisions on Amazon
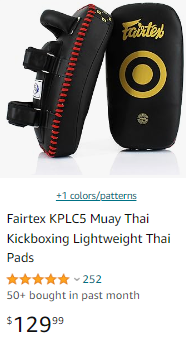
- Price: When people shop on Amazon, they expect to find good deals, so they carefully compare prices to get the most value. Take these two products as an example
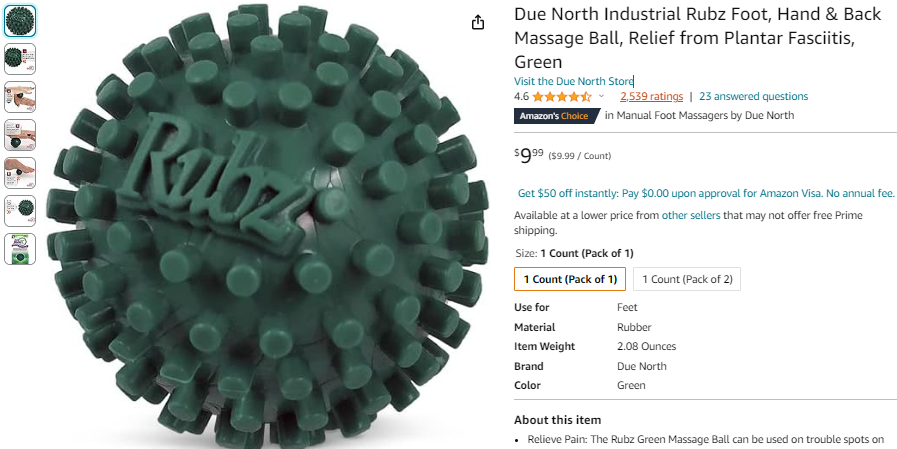
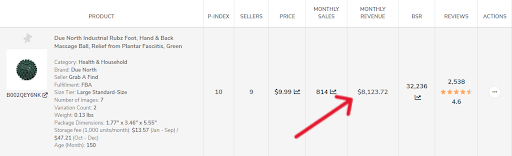
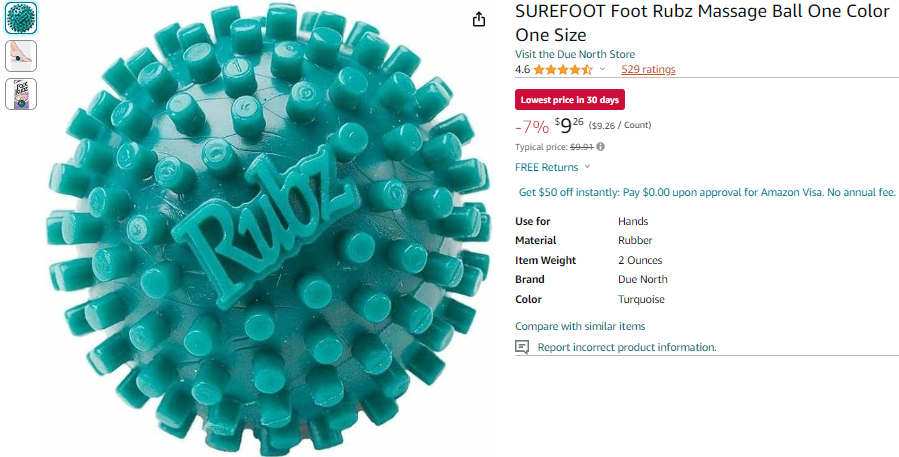
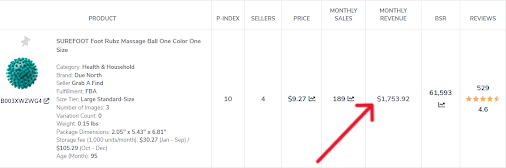
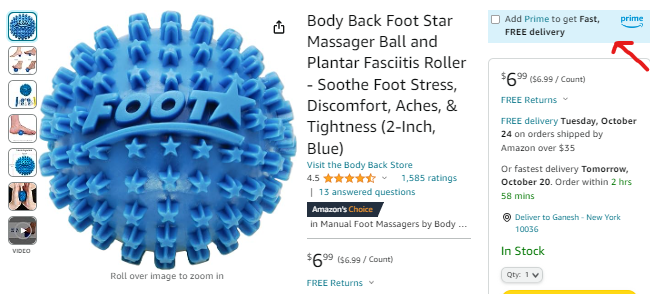
They were side-by-side on Amazon’s SERP when I searched for “Thai Pads”. While there might be some uniqueness to the high-priced product, not so many people are going to want to spend $100 extra unless they are familiar with the brand. - Customer Reviews: Reviews are one of the biggest buying factors on Amazon. In the images below, you can see the difference in sales for a product with 2,538 reviews, and a product with 529 reviews.
- Using Amazon FBA: When a product is labeled as “Fulfilled by Amazon,” it means that the product is stored in Amazon’s fulfillment centers, and Amazon takes care of the packing, shipping, and customer service. This is a game-changer, especially for prime users because they can get free 1-day shipping on these products.
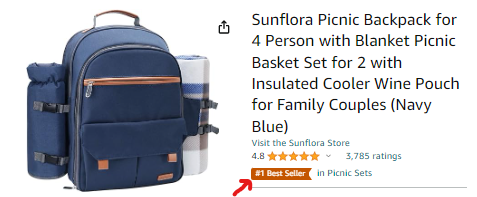
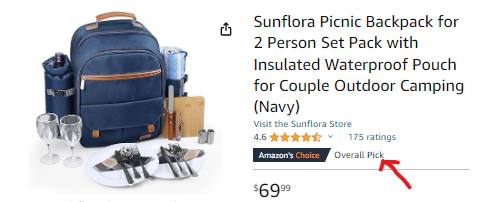
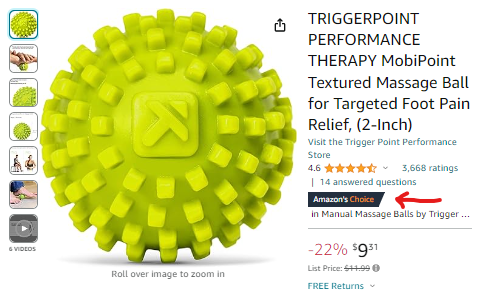
- Amazon’s Recommendation: Shoppers trust Amazon’s suggestions. When Amazon gives its stamp of approval for a product, the CVR and CTR usually go up and so does sales volume.
Here’s what that looks like:
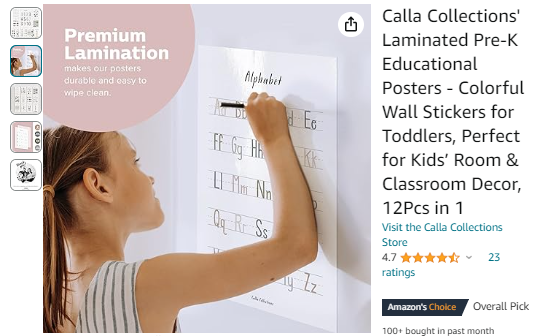
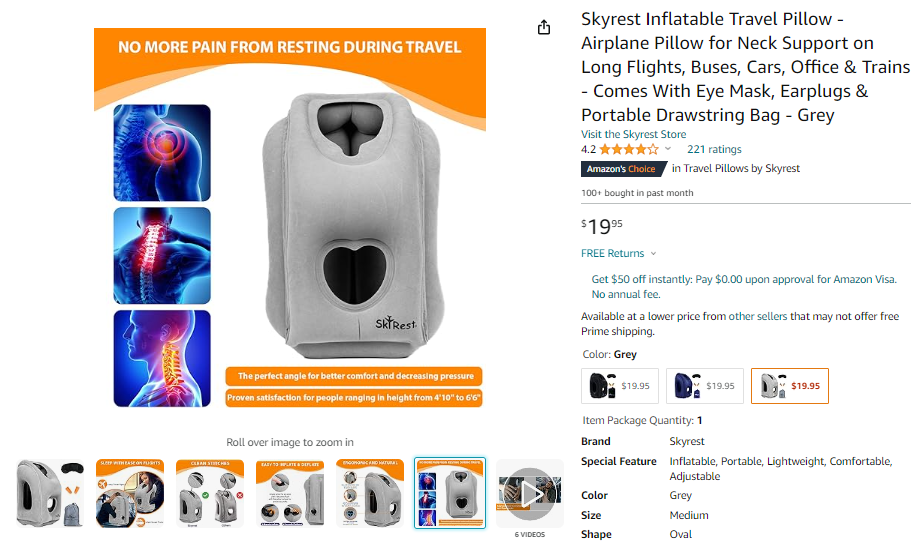
The “#1 Best Seller” tag indicates that this product is the top seller in its category.
“Amazon’s choice – overall pick” is Amazon’s recommended choice for various reasons such as consistent stock availability and positive customer reviews.
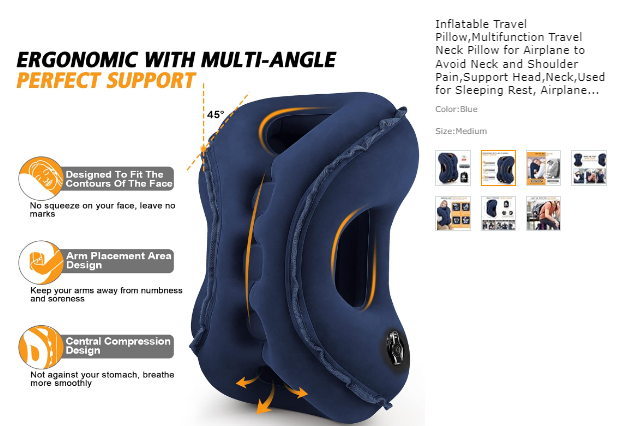
This type of “Amazon’s Choice” tag shows that Amazon recommends a product for shoppers looking for items from a particular brand (Trigger Point Performance Store) within a specific category (Manual Massage Balls) or for a specific keyword. - Product Images: People like to see clear and attractive pictures of the product they’re interested in. This helps them get a good idea of what they’re buying.
To make your listing more attractive, you should include different types of images such as the ones listed below:
Main/Hero image
Lifestyle Image
Infographic
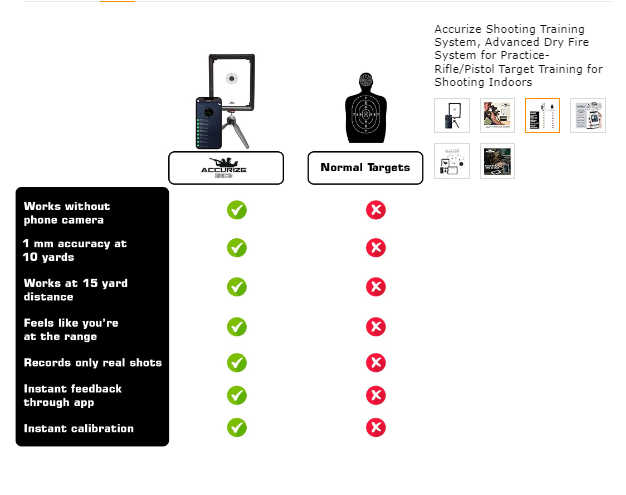
Comparison Chart - Product Description: Shoppers expect detailed descriptions that tell them all about the product’s features and benefits. This helps them understand what they’re buying.
Here’s what you should include:

- Key Features: These are the standout things that make your product awesome. For a phone, it could be a fantastic camera or a super-fast processor.
- Specifications: Shoppers love details. Tell them about the size, color, weight, and any special materials used. This helps them picture the product in their minds.
- How Your Product Helps: Explain how your product can make someone’s life better. If it’s a backpack, mention how easy it makes carrying heavy stuff.
- What’s Included: Tell shoppers if they get extra stuff with the main product, like accessories or a warranty.
- Useful Tips: If there are special care instructions or tips for getting the most out of the product, share them too.
Here’s an example of what your product description should look like
How to Optimize Your Amazon Product Listing
Now that you know what makes products rank on Amazon, as well as what shoppers are looking for, it’s time to start optimizing your listings. Here are some key things you must do to make the most out of your product pages:
- Use the Right Keywords: Keywords are the signposts that guide shoppers to your product.
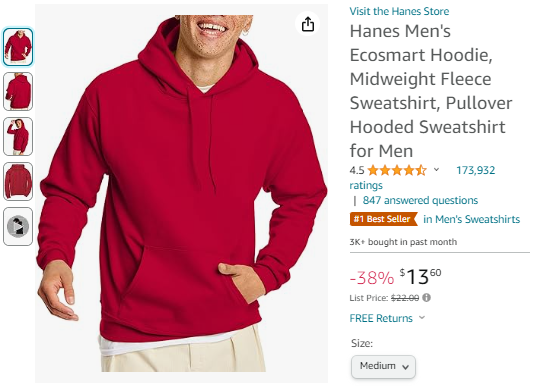
In addition to using the right keywords, it’s also important to place them strategically in order to improve your product’s visibility. Here are all the positions where you can insert keywords in your listing:- Product Title: The product title is the most crucial place for keywords. Always include the most important and most relevant keywords at the beginning of the title but make sure it’s meaningful.
Take this listing title for example
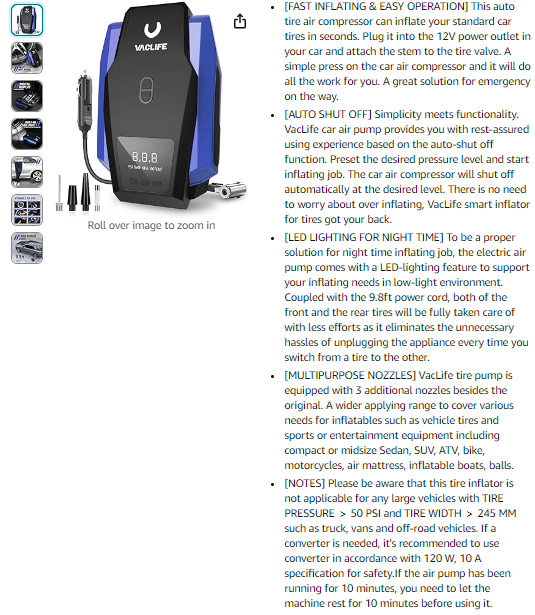
It incorporates the main keywords “Hoodie” and “Sweatshirt for men” in a way that the title still makes sense to the reader. - Bullet Points: Include relevant keywords naturally within your bullet points to improve your chances of ranking.
But just like the listing title example above, you need to do it subtly. This means your bullet points should still make sense to the reader.
The listing above highlights the major features of its product and incorporates keywords, which is great.
But what’s not great is the fact that most people will not read these bullet points.
People are scrolling faster now more than ever and the last thing you want to do is scare them away with a large block of text.
Besides, it’s old news that the Amazon algorithm only ranks the first 1000 characters so what’s the point of adding so many words?
To make the most of your listing bullet points, keep the character count (including spaces) below 1000 and make your final copy (after adding keywords) as meaningful as possible.
To check how many characters you’ve used, use this free tool. - Product Description: Explain the features, benefits, and uses of your product while incorporating keywords logically.
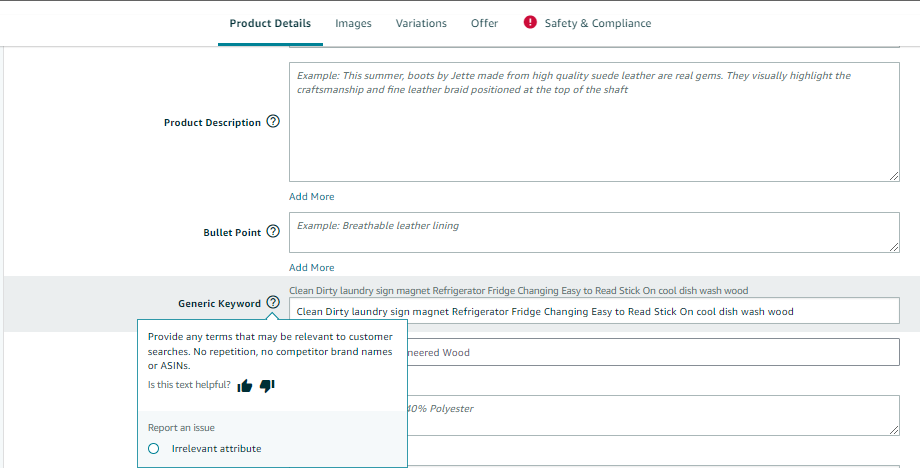
This product description is a good example because you can hardly notice that keywords were inserted. It’s entirely focused on explaining benefits in a clear way to the end reader. - Backend Keywords: In the backend of your Amazon Seller Central account, you can add hidden keywords that aren’t visible to shoppers.
You can use this section to include additional keywords that may not fit naturally into your product title or description. You can also add keywords in other languages like Spanish.
Here’s how it looks on Amazon Seller Central
- Product Title: The product title is the most crucial place for keywords. Always include the most important and most relevant keywords at the beginning of the title but make sure it’s meaningful.
- Choose the Right Title: Your title is the first thing a potential customer sees when your listing shows up on the search engine results page (SERP). It should convince shoppers to click on your listing and ultimately make a purchase.
In the examples above, the first listing seems to be all about including as many keywords as possible, even at the expense of the shopper’s understanding.
While the second listing includes relevant keywords but prioritizes conveying the product’s benefits to the shopper.
Using too many repetitions like we see in the first title takes up a lot of space and makes the listing less appealing to potential customers.
To optimize your listing title, here are some basic guidelines to follow:- Keep It Short and Sweet. Keep it between 100 and 150 characters for a better user experience.
- Use relevant keywords, but separate them with dashes (-) or pipes (|). This makes it easier to read and less complicated.
- Make it simple. Don’t use fancy words or try to stuff in too many keywords.
- Color, model number, series, and quantity should all be included (if required).
- If the item is part of a multi-pack, mention the amount — for instance, a 15-pack, a 5-pack, and so on.
- Capitalize the initial letter of each word.
- Instead of spelling out numerals, use numeric values, such as 7 instead of seven.
- Check for Spelling Mistakes.
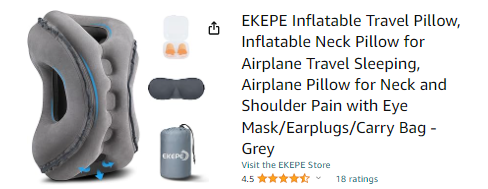
- Use Captivating Images: When selling on Amazon, pictures help you show off your product and convince people to buy it.
Here are some good examples from brands we work with:
To get the most out of the available image slots, here are some things you must do:- Take each photograph in bright white light.
- For the main image, show the product and all that comes with it on a white background.
- Use lifestyle images to show your product in use. Save your files in the JPEG (.jpg) format and ensure the images are large enough for the zoom function to work.
- To help drive more purchases, include an infographic outlining the product’s benefits.
- Use images with a resolution of 72 pixels per inch and are at least 1000 pixels on their longest side.
Extra tip: Canva lets you edit photo backgrounds easily. It also has ready-to-edit infographic templates as well as a photo resize option.
- Make Your Bullet Points Benefit-oriented: Bullet points break down information into easily digestible chunks, making it easy for your audience to understand why your product is valuable.
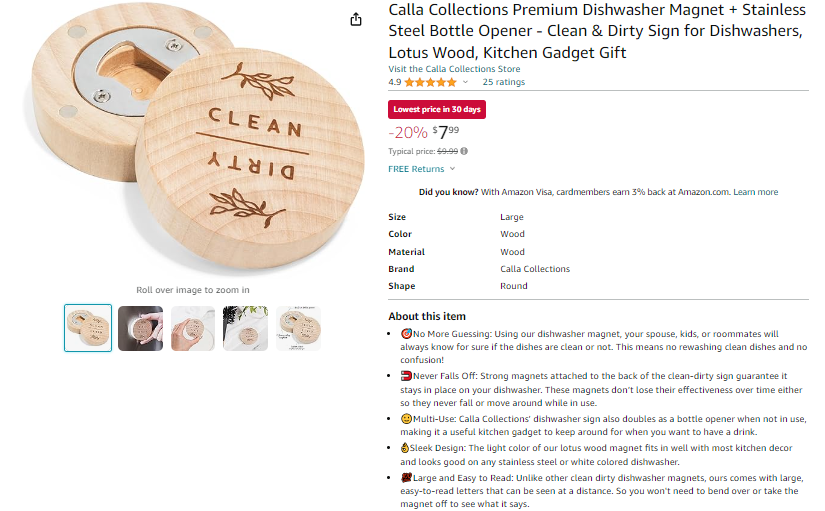
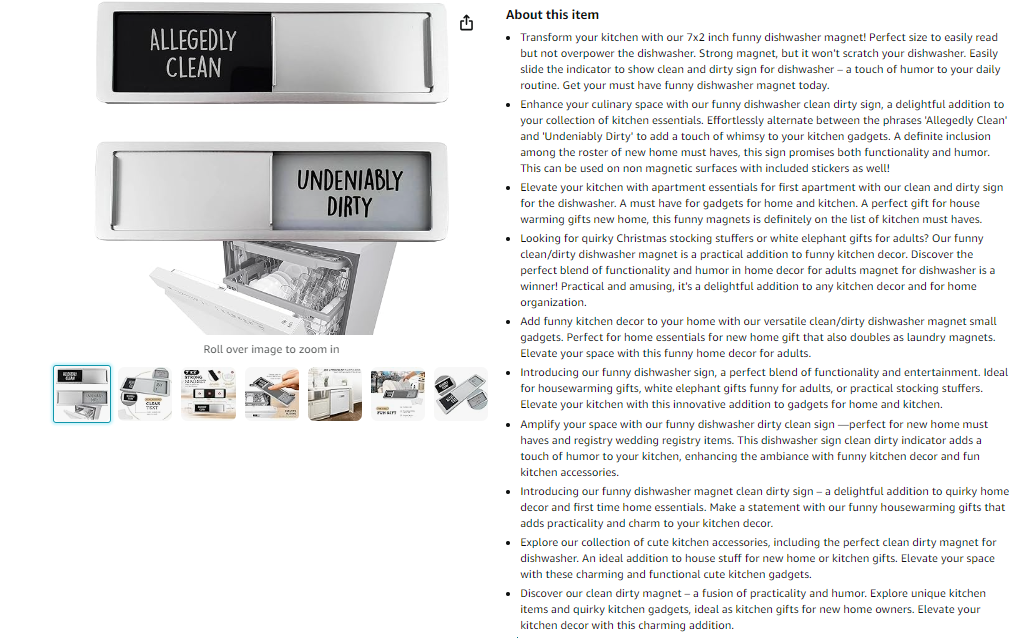
Take these two Amazon product listings for example
The bullet points above are a good example to model your listing after because they show potential customers what problems this dishwasher magnet solves and how it does it better than others.
The headings are benefit-focused too and each point is clear and concise so that even busy readers can easily see what the product offers and decide to buy it.
But these bullet points are not going to be of much help to the customer, for the following reasons:- Too many points are being conveyed in each bullet point, making it difficult for potential buyers to understand what the product can do for them.
- They contain too many unnecessary words. This overwhelms the reader and reduces the chances of them purchasing the product.
- The sentences in each paragraph do not “connect”. This breaks the flow of thought in the reader’s mind and makes it difficult for them to arrive at the decision to buy the product.
Here’s how to create benefit-oriented bullet points for your Amazon product listing:- List the main benefits of your product. For example, if you’re selling a smartphone, the benefits might include a great camera, long battery life, and fast performance.
- Highlight the benefits that are most relevant to your audience. A simple way to do this is to look through the reviews on similar product listings to find out what matters to your customers.
- Begin each bullet point with a strong action word. For instance, “Boost your productivity with…” Action words grab attention and make your benefits more compelling.
- Provide specific details about the benefits. If your product lasts a long time, say exactly how long. Specifics make your points more convincing.
- Keep your bullet points short and to the point.
- Each bullet point should be a complete statement, and the list should flow logically.
- After writing your bullet points, take a moment to review and revise. Check if they effectively communicate the benefits of your product and whether they are clear and concise.
- If possible, test your benefit-oriented bullet points with a small group of your target audience. Their feedback can help you fine-tune your messaging.
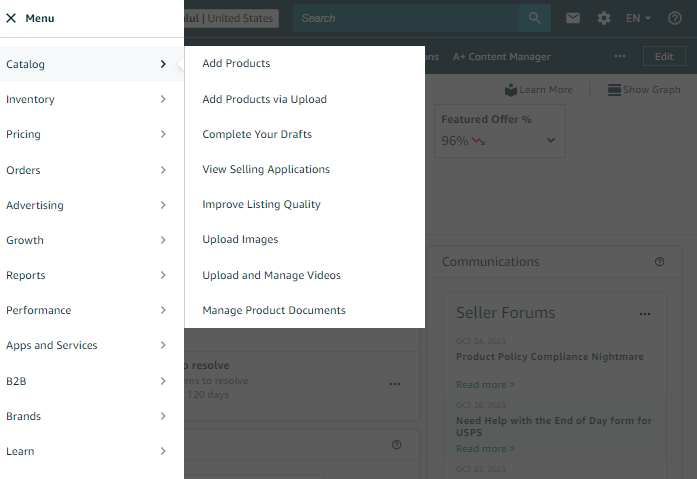
- Leverage Videos: Many sellers don’t go the extra mile so using videos is a great way to stand out from competitors. Here’s how to add a video to your Amazon product listing in 5 simple steps:
Step 1: Login into your Amazon Seller Central account
Step 2: Go to the Inventory drop-down menu on the top left corner. Click on “Catalog” and select “Upload and Manage Videos“
Step 3: Click the “Upload video” button.
Step 5: Click submit. Your video will be reviewed in 1-7 days.
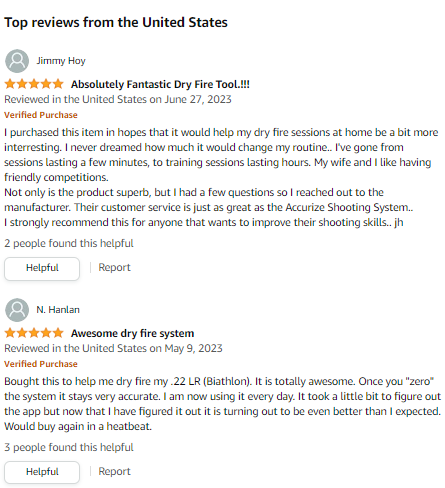
When it’s uploaded, it’ll appear like this - Get Positive Reviews: Positive reviews influence SEO ranking, build trust among potential customers, and increase sales.
According to Junglescout, 79% of consumers are influenced by ratings and reviews.
Here are a few tips on how to get more positive reviews:
Provide high-quality products and exceptional customer support.
Positive reviews like the ones above help intending customers trust you and make up their minds to buy your product faster.
Politely ask happy customers for their feedback.
Stay in touch with customers to build trust and rapport.
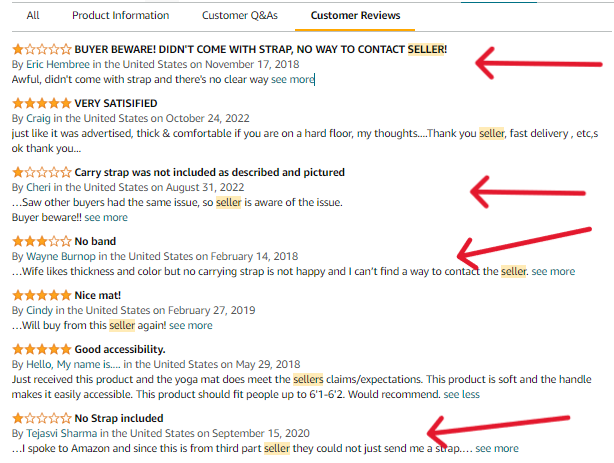
Reach out to customers with negative reviews and try to fix the problem.
In the listing above, everyone who left a negative comment wants a strap. Anyone looking to buy the product will read the comments and will likely buy from a different seller instead.
On the contrary, if the seller would reach out and offer them straps for free, these 1-star reviews might be removed by the customers, and they might even come and buy again because of the good customer support.
Reach out to customers via email, asking for their thoughts.
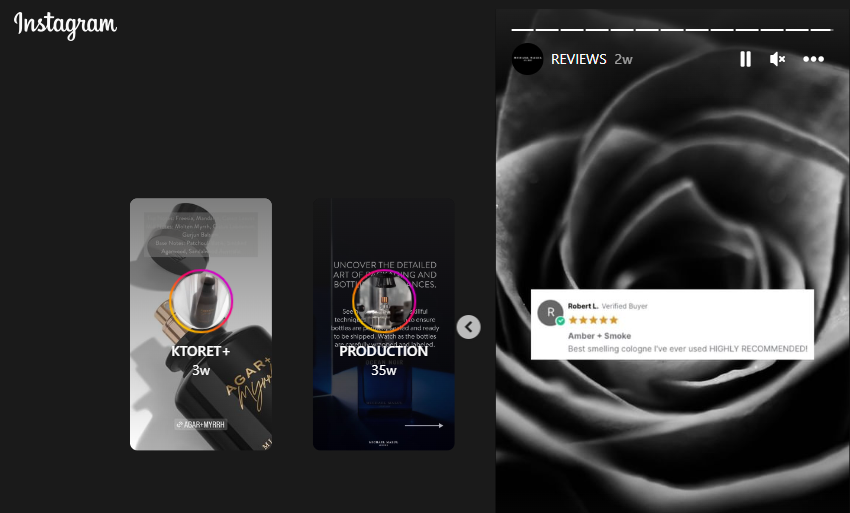
Share reviews on social media to encourage participation.
You can share them on your Instagram story like this
Or share them on your feed. Either way, customers who follow you on social media are likely to see it and be encouraged to leave positive comments the next time they buy from you.


How to Create Product Listings on Amazon
Anyone can set up an Amazon product listing, but not everyone can do it right. Here are 6 simple steps for listing a product on Amazon the right way:
Step 1: Login into your Amazon Seller Central account using your credentials
Step 2: Go to the Inventory drop-down menu and click on the button that says “Add a Product.“

Step 3: When you go to the Add a Product Page, you get access to the three methods of adding products.
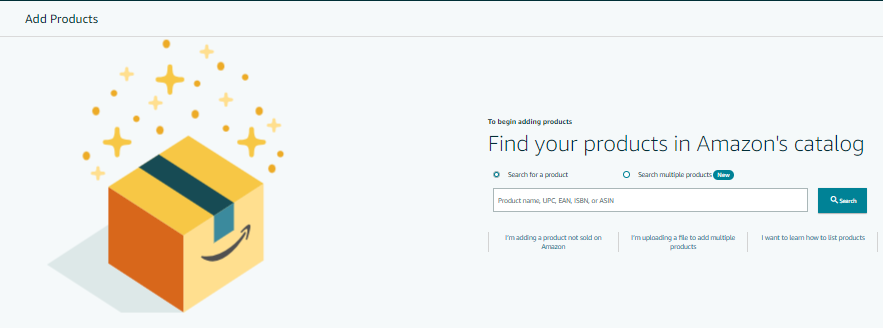
Method 1 – Add a product that already exists on Amazon. Access this by searching or typing for the product ID or the name.
Method 2 – Click on “I’m adding a product not sold on Amazon” below the search box. Use this method when listing a product that isn’t already on Amazon.
Method 3 – If you are uploading multiple products at once, click on the option that says “I’m uploading a file to add multiple products.”
Step 4: Once you upload your product, it will direct you to a page where you assign a category to your product.
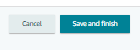
Step 5: Once you are done categorizing your product, fill in the following details and answer the questions accordingly.
Step 6: Confirm your answers and click on “Save and Finish” at the bottom of the page.
Your Product listing page is now ready for display and access on the official Amazon website.
Bonus – How to Drive Traffic to Your Amazon Listing Using Ads
If you already have a product listing on Amazon and you want to increase your sales quickly, Amazon PPC is the way to go.
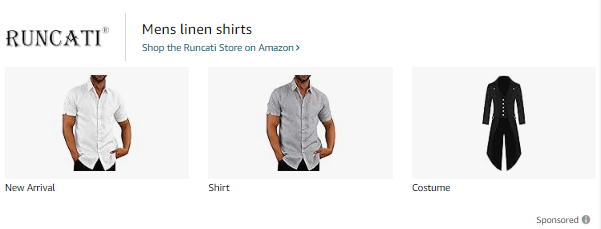
When you search for something on Amazon, you might see sponsored results throughout the SERP or on product pages.
Search results
Product page
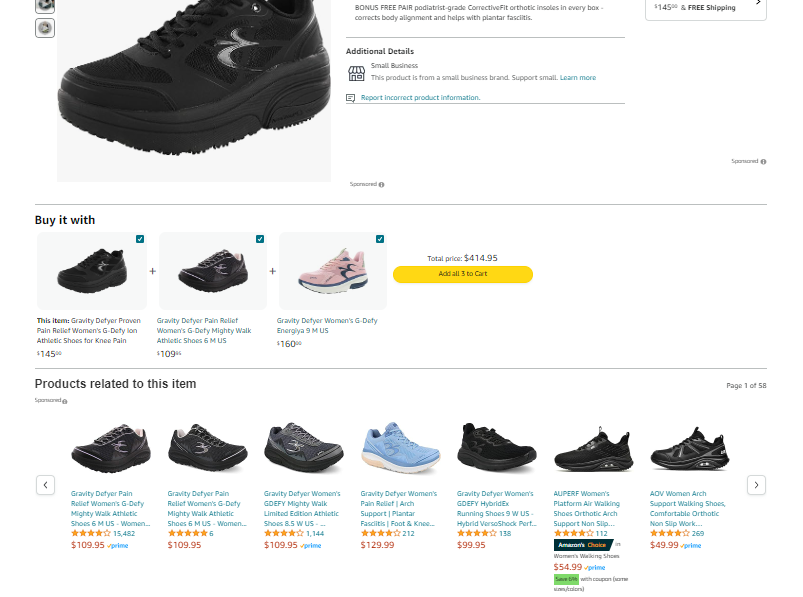
These are ads, and they’re there to tell you about products that match your search query. Many times, they even get seen before products that rank organically, increasing their chances of getting clicked on.
Amazon sellers pay for these spots to make sure more customers see their products when shopping, and they are only charged when a shopper clicks on these ads.
How to Set Up Your PPC Campaigns on Amazon
To set up Amazon ads, there are 3 important things you need to know:
- The type of ad you are creating
- How to do keyword research
- How to bid on keywords profitably
Ad Types
Amazon offers different types of ads, such as Sponsored Products, Sponsored Brands, and Sponsored Display. These determine how and where your ads appear.

- Sponsored Products: These ads promote individual products. When shoppers click on them, they’re taken to your product’s detail page.
- Sponsored Brands: These ads are more about showcasing your brand. They can feature your logo, a custom headline, and multiple products.
- Sponsored Display: These ads can appear on and off Amazon, targeting shoppers who fit certain criteria defined in your audience settings.
How to Find and Add the Right Keywords
Keywords are the words or phrases that your ads show up for when shoppers on Amazon search for them. For example, if you’re selling a phone case, you might use keywords like “protective phone case” or “iPhone cover.”
Picking the right keywords is very important, nothing else matters if you get this part wrong. Here are three methods to help you find and add these essential keywords:
- Put Yourself in Your Customer’s Shoes
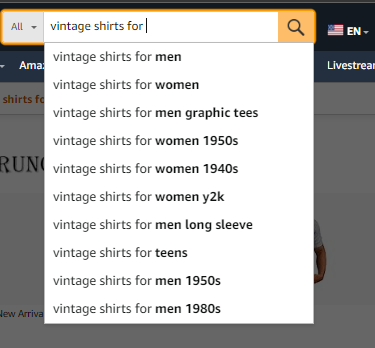
Think like a shopper. Imagine you’re looking for a product like yours. What words or phrases would you use to search for it? Make a list of these keywords.
You can also check the suggestions that Amazon gives as you start typing in the search bar. - Use Amazon’s Suggestions
When creating your ad campaign, Amazon suggests keywords that you can bid on.
Just like using the search bar, not all the suggested keywords will be relevant to the product you are advertising so you should review the suggestions first.
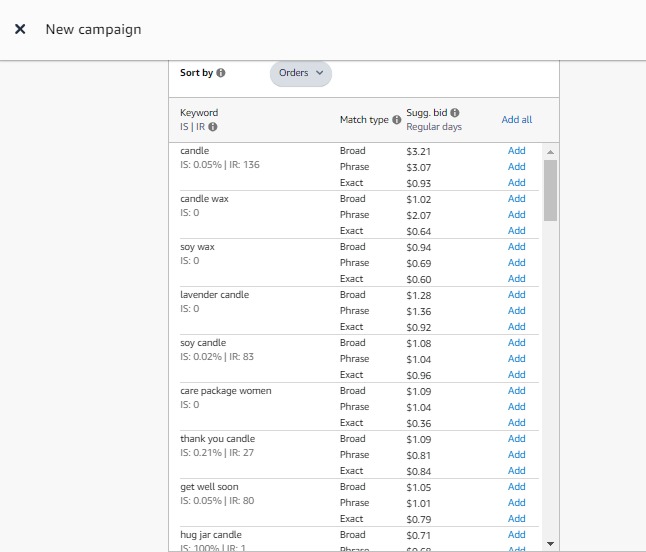
For example, if you are creating a PPC campaign for a “Hug in a jar” candle, “thank you candle” is not a keyword you should bid on. - Keyword Harvesting
Keyword harvesting for an Amazon ad campaign involves identifying and collecting relevant keywords from previous campaigns’ search terms to use in your new ads.
Of all the three methods, it is the most recommended. Here’s how it works:
As your auto campaigns run, Amazon collects data on how your keywords perform. This data includes information on clicks, impressions, and conversions.
After your campaign has run for a while, you can review its data to identify which keywords are driving the most clicks and conversions. These high-performing keywords are stored in your search term reports.
These top-performing keywords are then used in creating manual campaigns.
Since they have been proven to attract customers, using them in separate campaigns has a very high probability of performing well.
On the flip side, you’ll also find keywords that aren’t performing well in your search term report. These should be negated to prevent your ads from showing up for them again.
As you can already guess, this method will produce better results than the other two, but it is a time-consuming process, especially when you are running PPC campaigns for multiple ASINs.
This is why experts recommend trustworthy AI automation tools like AiHello.
With AiHello’s keyword harvesting feature, you can automatically extract new keywords from your auto campaigns and insert them directly into manual campaigns without going through the stress of looking through search term reports.
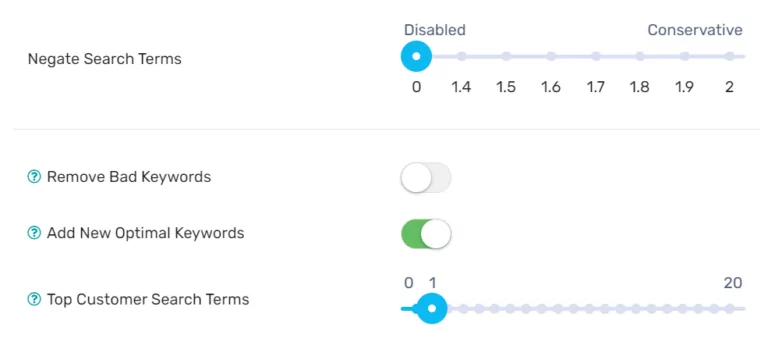
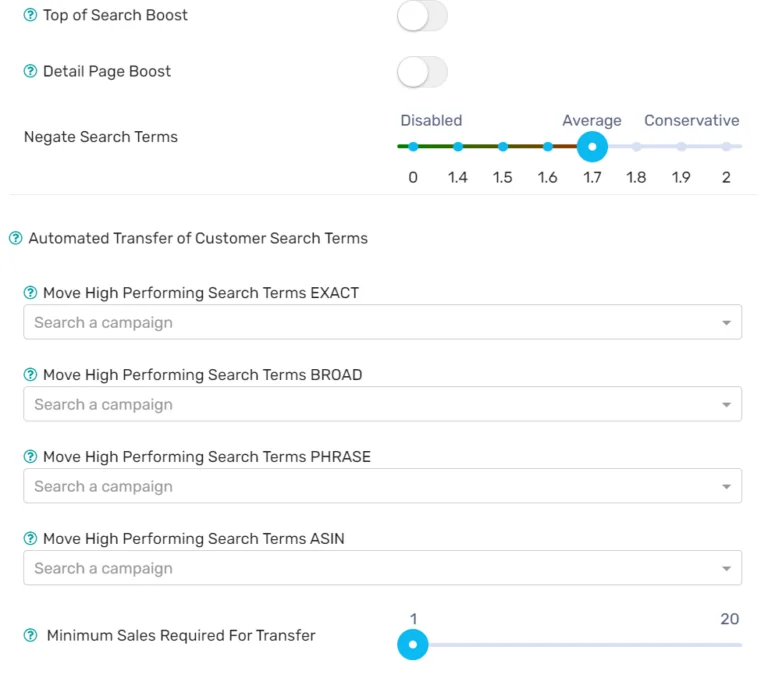
You only need to connect your auto campaigns to the relevant exact, broad, phrase, and ASIN targeting campaigns and decide how many conversions you need on a search term before it’s transferred by the system.
Once you do these, AIHello will add dozens, or hundreds of new keywords automatically to your manual campaigns each month.
All You Need to Know About Bidding On Amazon
Bids are the price you’re willing to pay for each click your ads get. Higher bids get you more clicks and low bids get you a better ROI.
With the right bidding strategy, you can make the most out of your advertising budget and increase your chances of reaching potential customers.
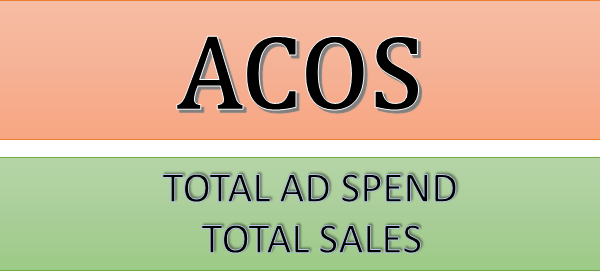
The key to successful bidding is to find the sweet spot. You want to bid enough to get good ad placements, but not so much that your ACoS becomes too high. It’s a bit like finding the right balance on a seesaw.
When it comes to bidding effectively, you have two main options:
Manual Bidding
With this type of bidding, you decide manually how much you’re willing to pay for each keyword.
There are two common ways to do this: RPC (revenue per click) and rule-based bidding.
Regardless of the strategy you choose, you’ll need to have a target ACoS (Advertising Cost of Sales) in mind for manual bidding to work.
We usually suggest using your current ACoS as your target if you’re trying to grow sales, and If you’re trying to decrease ad costs, we suggest targeting 5% less than your current ACoS.
Here’s how the two manual bidding strategies work:
- RPC Bidding: This involves multiplying your ACoS target with your EPC (earnings per click) to find out what your ideal CPC should be.
For example, let’s say your target ACoS is 35% and you earn $6/click on a keyword. You should be paying $2.1/click to hit your target (0.35 * 6.0). - Rule-Based Bidding: With this method, you set certain rules for your bids. For example, if ACoS is above X amount, decrease bids by Y amount, and so on. This is more difficult to master, especially for beginner sellers, but can be worth it if you think RPC bidding doesn’t work for you.
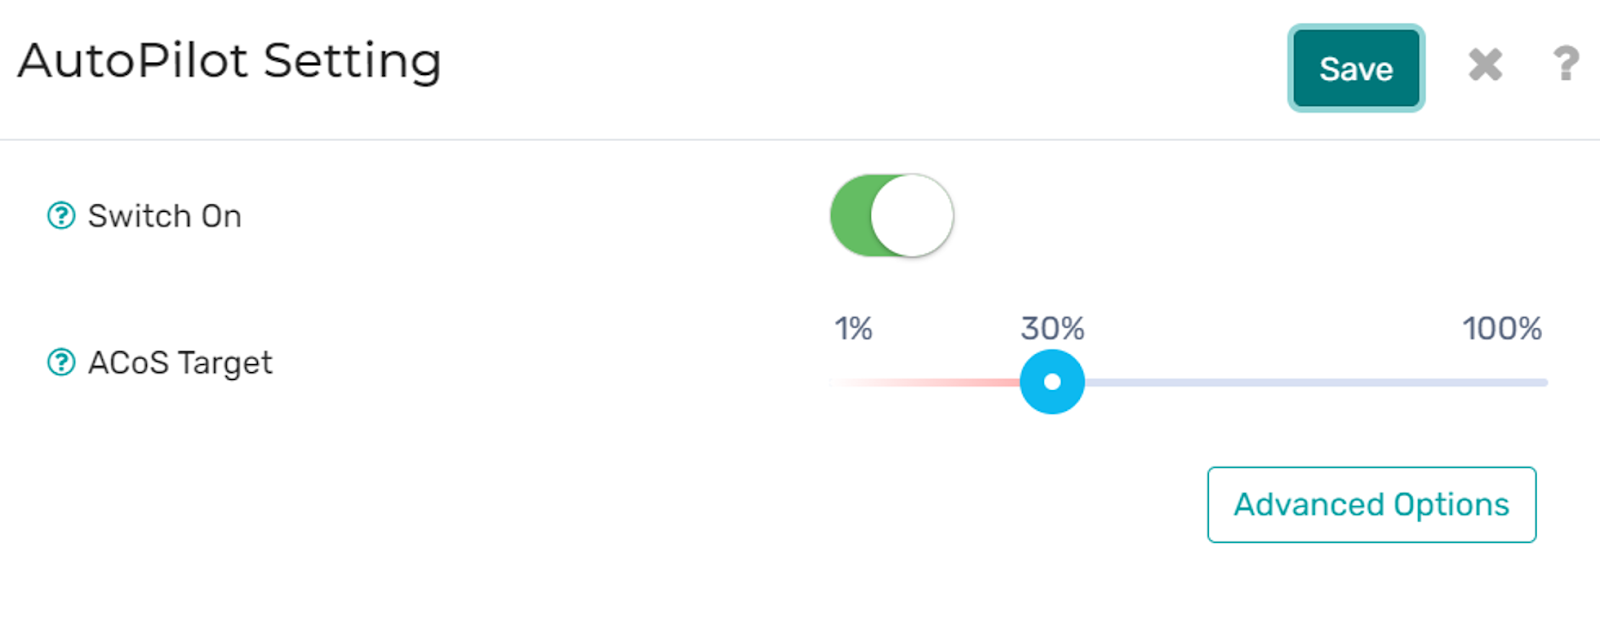
Automatic Bidding
With automatic bidding, you’re also trying to hit a certain ACoS target.
The major difference though, is that rather than making changes or coming up with bidding rules yourself, you simply input your target ACoS and the algorithm does all the hard work for you – adjusting your bids daily to achieve the target ACoS.
AI is more accurate than RPC bidding and more straightforward than rule-based bidding because it develops rules that are fit for each account based on its historical data.
This type of bidding is the easiest option for those new to advertising because it requires little to no supervision and ensures that your ads show up for the right keywords at the right time.
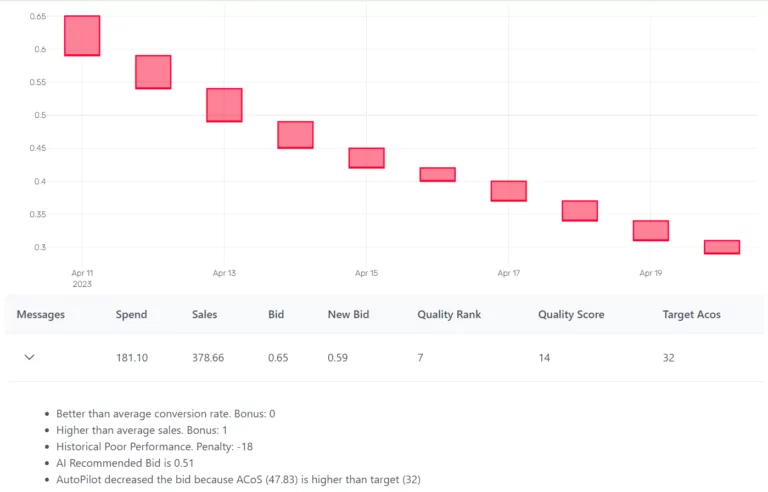
The bid changes above were from the AiHello software for a poor-performing keyword. The bid changes above were from the AiHello software for a poor-performing keyword.
Ready to skyrocket your sales?
AiHello automates everything, from campaign creation, bidding, keyword addition or removal, and negation so you can grow your business. We also have our own in-house team of PPC specialists, copywriters, catalog experts, and graphic designers to help you with all things Amazon.
Wrapping Up
Creating a product listing on Amazon is like setting up the storefront of a shop in a busy mall.
Just like a beautifully designed shop window, your listing needs to stand out, invite people in, and make them want to explore your offer.
Having compelling listing content and adhering to the guidelines of Amazon’s ranking algorithm will help you get traffic and convert it into real revenue, which is all you need to sell successfully on the world’s largest marketplace.